📘 ABP Event Ticket — Documentation v1.0.4
Free + PRO user guide — setup, event configuration, ticket and seat plans, PRO tools, orders, global configuration, shortcodes and templates.
🚀 Getting Started
Thank you for choosing ABP Event Ticket. This documentation walks you through the complete plugin — creating events, configuring ticket and seat plans, scheduling dates, collecting attendee information, and selling tickets through WooCommerce.
📄 Document information
- Version — 1.0.4
- Author — ABPTEAM
- Plugin — ABP Event Ticket
- Requirements — WordPress 6.2+, PHP 7.4+, WooCommerce 8.0+
🎯 What ABP Event Ticket does
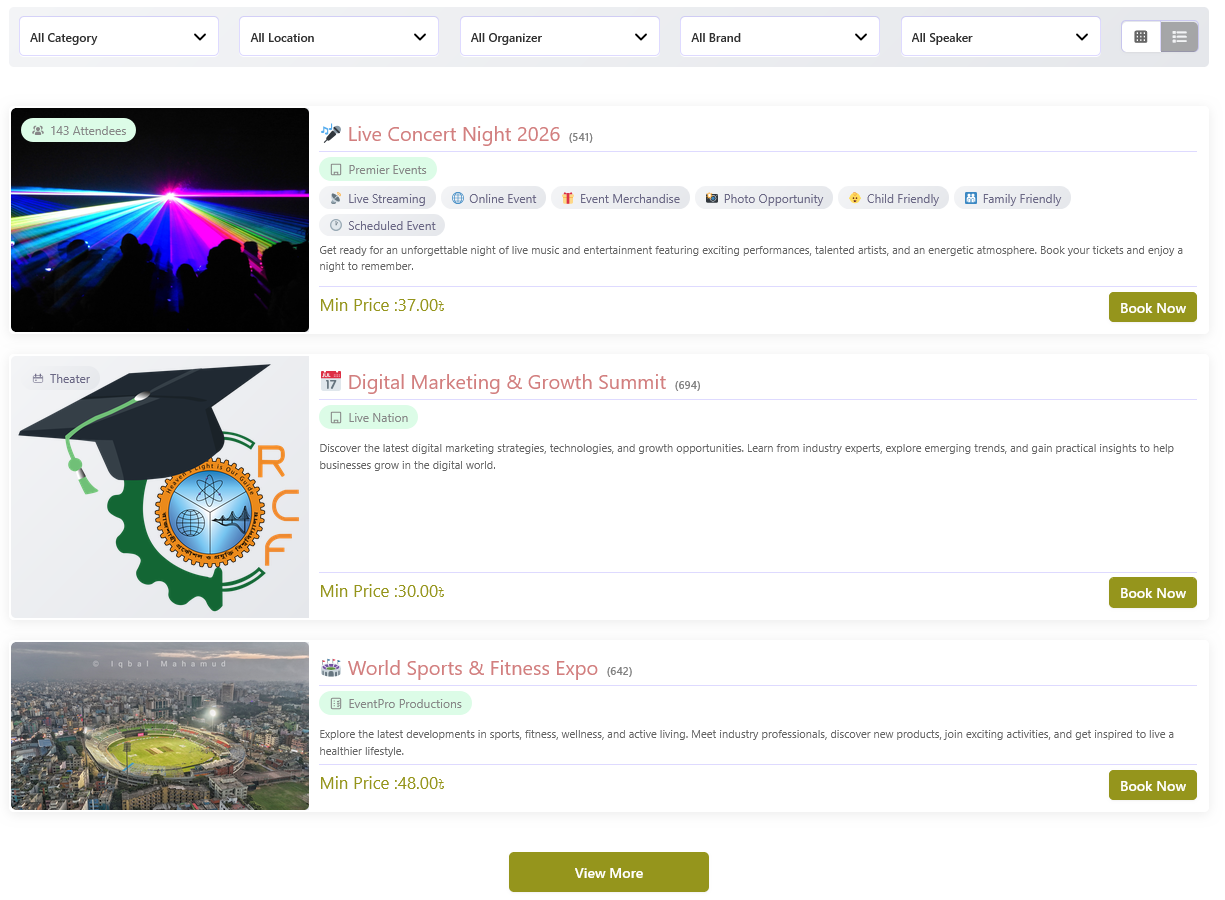
ABP Event Ticket turns WooCommerce into a complete event ticketing and registration system. From a single dashboard you can create events, define ticket types and prices, design reserved seat plans, publish event schedules, and sell tickets through the standard WooCommerce checkout and cart.
- Create and manage events with rich details, galleries, and frontend templates.
- Sell general admission tickets or reserved seats from reusable seat plans.
- Configure dates, times, ticket availability, and advance booking buffers.
- Collect attendee information through configurable Attendee forms.
- Maintain reusable global configuration for ticket types, seat plans, taxonomies, speakers, FAQs, and terms.
- Embed events anywhere with shortcodes such as
[abpet-post],[abpet-booking]and[abpet-gallery].
📥 Installation
ABP Event Ticket is a standard WordPress plugin. Install and activate it like any other plugin, then enable the store features you need. WooCommerce must be installed and active for ticket sales to work.
✅ Requirements
- WordPress 6.2 or newer.
- PHP 7.4 or newer.
- WooCommerce 8.0 or newer, installed and activated.
🧩 Install from the dashboard
- Upload the plugin — Go to Plugins → Add New → Upload Plugin and choose the plugin ZIP file.
- Install — Click Install Now and wait for WordPress to finish.
- Activate — Click Activate Plugin.
- Verify WooCommerce — Make sure WooCommerce is installed and activated, and complete its setup wizard if you have not already.
/wp-content/plugins/ via FTP or your file manager,
then activate it from the Plugins screen.
⚙️ First-time setup
- Open Global Configuration — Set the menu label, and choose which features to enable under Feature ON/OFF.
- Create supporting data - Add ticket types, seat plans, categories, locations, organizers, brands, features, and speakers as needed.
- Create your first event - Go to Events → Add New and configure the general settings, tickets, and dates.
- Publish a list or booking page — Add the
[abpet-booking]shortcode to a page to display your events.
👑 Optional PRO add-on
ABP Event Ticket PRO extends the free plugin; it does not replace it. First install and activate WooCommerce and ABP Event Ticket, then download PRO from the ABP Event Ticket PRO page and upload its ZIP through Plugins → Add New → Upload Plugin. The current PRO release requires PHP 8.0 or newer.
- Keep the free plugin and WooCommerce active, then upload and activate the PRO plugin ZIP.
- Open the Event Ticket dashboard and enter your purchased license key in the PRO License card.
- Install and activate ABP PDF Tools if you plan to use PDF tickets or attendee lists.
PRO adds discounts, partial payments, cancellation requests, PDFs and booking emails, admin booking tools, CSV export, session statistics, and ticket check-in.
⭐ Features
ABP Event Ticket combines event publishing, ticket selling, reserved seating, attendee registration, and WooCommerce order handling into one plugin. The FREE features are included in ABP Event Ticket; the features marked PRO require the optional ABP Event Ticket PRO add-on.
🎟️ Events & Tickets
- Event creation and management with a dedicated post type.
- Event list with pagination and status filters.
- Event edit, clone, view, trash, restore, and permanent delete actions.
- General admission ticket sales and reserved seat ticket sales.
- Multiple ticket types with individual pricing and quantity controls.
- Minimum, maximum, and reserved quantity limits per ticket type.
- Availability tracked per ticket type and per session.
🪑 Reserved Seating
- Reusable seat plans with a drag-and-drop designer.
- Reusable ticket types with a colour, prefix, icon or image.
- Custom cell labels, dimensions, spacing, spanning and layouts.
- Ticket-type assignment to seats, with a per-type seat count for each plan.
- Decoration items (doors, stairs, aisles, windows and more) for non-seatable areas.
- Seat plans attached to events with a frontend name and per-type prices.
🗓️ Scheduling
- Specific-date and periodic-date event schedules.
- Date-wise and day-wise time configuration.
- Special on/off dates and weekend rules for periodic schedules.
- Advance booking limits and sale-closing buffer controls.
- Frontend date UI that adapts to the number of available dates.
🧾 Content & Registration
- Configurable attendee information (client) forms.
- Optional additional services with quantity, price and max-quantity limits.
- Event FAQs and Terms & Conditions.
- Event timeline with time, title, and description entries.
- Event speakers with profiles (bio, photo, designation, company, website, social links).
🗂️ Taxonomies & Display
- Location, category, organizer, and brand management.
- Google Location Map with an admin search-and-select picker and a key-free iframe fallback.
- Three frontend location map styles: default, light, and modern.
- Event features, related events, gallery, and image slider.
- Three details-page templates: default, light, and modern.
- Event search, filtering, and pagination.
🛒 Commerce & Global Configuration
- WooCommerce cart, checkout, payment, tax, coupon, and order integration.
- Booking and order details in the WordPress dashboard.
- Global and event-specific configuration with reusable data.
- Feature enable/disable controls for every module.
- Translation-ready, with a bundled
.potfile. - Polylang-compatible frontend language filtering when Polylang is active.
- Shortcode-based embedding — the plugin's post type uses the classic editor, not Gutenberg.
👑 PRO Add-on
- PRO Seasonal and Early Bird discounts, configured globally or per event.
- PRO Partial payments with deposit and balance tracking.
- PRO Customer cancellation requests with an event-time cutoff and administrator approval.
- PRO PDF tickets and attendee-list PDFs, customizable booking emails, and resend tools.
- PRO The
[abpet-ticket]ticket lookup, PDF download, and check-in page, with optional QR codes on booking PDFs. - PRO Admin-created/edited bookings, booking CSV export, session statistics, and ticket check-in.
👑 ABP Event Ticket PRO
PRO is an optional add-on for the free ABP Event Ticket plugin. It uses the event, ticket, seat-plan, attendee, and booking data provided by the free plugin, and adds tools for payments, customer service, reporting, and event-day operations.
✨ PRO features
| Feature | What it does | Where to find it |
|---|---|---|
| Seasonal & Early Bird Discounts | Configure date-based discounts globally or for individual events. | Global Configuration and event settings |
| Partial Payments | Let eligible customers pay a deposit and track the remaining balance. | Global Configuration, event settings, and WooCommerce My Account |
| Cancellation Requests | Customers can request cancellation before the configured event start cutoff; administrators approve or reject requests. | WooCommerce My Account and Cancel Requests |
| PDF Tickets & Attendee Lists | Generate individual booking tickets and filtered booking-list PDFs with configurable fields. | Booking actions and Orders |
| Booking Emails | Configure booking email content, attach PDFs, and resend booking emails. | Global Configuration → E-Mail and booking actions |
| Admin Booking Tools | Create bookings for customers and edit event dates, tickets/seats, attendee details, and billing data. | Add Order and booking actions |
| CSV Export & Session Statistics | Export filtered booking data and review event-session ticket counts and revenue. | Orders and event-list actions |
| Ticket Check-in | Look up a booking ticket and mark it as checked in. The ticket lookup page is provided by a PRO shortcode. | [abpet-ticket] page and booking actions |
| Ticket QR Codes | Include a QR code and ticket PIN on individual booking PDFs for quick access to the ticket page. | Global Configuration → Feature ON/OFF and PDF tickets |
| Customer Booking Actions | View booking details, request cancellation when enabled, and manage outstanding balances. | WooCommerce My Account |
| License & Updates | Activate or deactivate the site license and receive eligible PRO plugin updates. | Event Ticket Dashboard → PRO License |
🛠️ Configure and use PRO
Discounts
- In Global Configuration → Feature ON/OFF, enable Seasonal Discount or Early Bird Discount. Enable the corresponding global option too if the rule should apply site-wide.
- For a global rule, open Global Configuration → Global Discount, add one or more date ranges, enter each percentage, and save.
- For an event-specific rule, edit the event, open its Discount tab, add date ranges and percentages, and save the event. Event rules are configured separately from global rules.
Partial payments
- Enable Partial Payment under Global Configuration → Feature ON/OFF.
- Open Global Configuration → Partial Payment to set a default fixed amount or percentage.
- Edit an event, open its Partial Payment tab, enable partial payment for that event, and enter the amount or percentage. Customers can choose a payment option at checkout; remaining balances are available through their WooCommerce account.
Cancellation requests
Enable Customer Cancel Request in Global Configuration → Feature ON/OFF. In Cancel Requests, open the cancellation settings and set the cutoff in hours or days before the event starts. Customers submit requests from WooCommerce My Account; an administrator must approve or reject each request. Approval cancels the booking and releases its ticket/seat inventory.
PDF tickets and attendee lists
Install and activate ABP PDF Tools. Use the dashboard's Fix action to create the Ticket Download
Page if it is missing, then add [abpet-ticket] to a page for ticket lookup and check-in.
Configure ticket branding under Global Configuration → PDF; configure company details and visible
columns under Order Lists PDF. Individual booking PDFs are available from the order/booking actions.
PDF generation is unavailable until ABP PDF Tools is active.
Booking emails
Use Global Configuration → E-Mail to enable booking email, choose the order statuses that trigger
it, set sender and subject information, edit the email content, and choose whether to attach a PDF.
The editor supports placeholders such as #client_name, #order_id,
#post_name, #booking_details, #ticket_details,
#bill_info, and #price_details. Administrators can resend a booking email
from its order action.
Orders, reports, and check-in
Use the booking/order list to create or edit bookings, export the current booking results as CSV, and
download filtered attendee-list PDFs. The Event list's Statistics action opens session-level
ticket and revenue information. Check in a ticket with the [abpet-ticket] page or the
check-in action on its booking; permitted staff must be logged in.
🔑 License and updates
The PRO License card appears in the Event Ticket dashboard. A 30-day trial is available for a new installation; to continue using PRO after the trial, enter the key from your purchase and choose Activate License. The license is associated with the site where it is activated; deactivate it before moving the license to another site. A valid license enables plugin updates. License status and any expiry information appear on the card.
📦 Install PRO
- Purchase or download ABP Event Ticket PRO from the official PRO page.
- Confirm WooCommerce and the free ABP Event Ticket plugin are active.
- Confirm the server runs PHP 8.0 or newer.
- In WordPress, go to Plugins → Add New → Upload Plugin, upload the PRO ZIP, then activate it.
- Open the Event Ticket dashboard, enter your license key in the PRO License card, and activate it.
- Install and activate ABP PDF Tools to enable PDF generation.

For setup steps, see Ticket Lookup Shortcode and Ticket QR Codes.
🎟️ Ticket Lookup Page PRO
Use the PRO shortcode to give customers and authorized staff a login-protected page for viewing a booking ticket, downloading its PDF, and checking in.
Create the page
- In WordPress, create a page named something like My Event Ticket.
- Add the shortcode
[abpet-ticket]to the page content and publish it. - Alternatively, use the Event Ticket dashboard's Ticket Download Page status action and click Fix to create the expected ticket page automatically.
- Keep the page published and accessible to the intended logged-in customers or staff.
Look up a ticket
- Sign in to the WordPress/WooCommerce site. The shortcode does not show booking information to signed-out visitors.
- Enter the ticket PIN in the Order ID / Ticket ID field. Its format is
ORDER_ID-BOOKING_ID; for example,123-5. - Select View Ticket to see the event, session, ticket, attendee, and billing details available to that user.
- Use the booking PDF download or check-in action if it is available to your account.
QR codes printed on PRO PDF tickets point to this ticket page and include the ticket PIN. Scanning users must still sign in; if the PIN is not filled automatically, enter the PIN printed below the QR code.
See PRO Ticket QR Codes for QR setup and usage details.
🔳 Ticket QR Codes PRO
Add a QR code and its ticket PIN to an individual booking PDF so customers or authorized staff can quickly open the ticket lookup page.
Enable QR codes
- Confirm that ABP Event Ticket PRO is installed and active alongside the free event plugin and WooCommerce.
- In the Event Ticket admin, open Global Configuration → Feature ON/OFF.
- Enable QR Code? and save the configuration.
- Confirm the Ticket Download Page exists. Use the dashboard's Ticket Download Page → Fix action to create it if needed; the page uses
[abpet-ticket]. - Generate or download an individual booking PDF. When QR Code is enabled, the PDF includes the QR image and the associated ticket PIN.
Scan and check in
- Scan the QR code to open the ticket lookup page on your site.
- Sign in with the customer account that owns the booking, or an account with an authorized staff role.
- If the PIN field is not populated after scanning, enter the PIN printed directly under the QR code. It uses the format
ORDER_ID-BOOKING_ID. - Review the booking and use the check-in action if your account is authorized.
api.qrserver.com); generating the image therefore sends that encoded URL/PIN to the service. Consider this when handling booking data and sharing PDFs.
For page creation, login, PIN format, and booking access rules, see PRO Ticket Lookup Shortcode.
📌 Applications
ABP Event Ticket is flexible enough for almost any ticketed or registration-based event. Whether you run general admission or fully reserved seating, the same workflow applies: create an event, define tickets, and publish it.
🎯 Common use cases
🎤 Concerts & Shows
Reserved seating with seat plans, tiered ticket types, and date-based performances.
🏛️ Conferences & Summits
Multiple ticket types, speaker profiles, a full timeline, and attendee registration forms.
🎪 Festivals
Periodic dates, capacity controls, additional services, and general admission tickets.
🗣️ Workshops & Classes
Day-wise schedules, limited capacity, and simple registration forms.
⚽ Sports & Tournaments
Seat plans with ticket-type assignment and real-time seat availability.
💻 Online Events
Set the event type to Online so the details page shows Online / TBA instead of a physical venue. Tickets, dates, and booking work exactly the same way.
🧭 Menu Overview
After activation, ABP Event Ticket adds one top-level admin menu. All plugin screens are tabs inside that menu, so you can move between events, orders, ticket/seat plans and global settings without leaving the plugin.
📚 Main menu tabs
| Menu | Purpose |
|---|---|
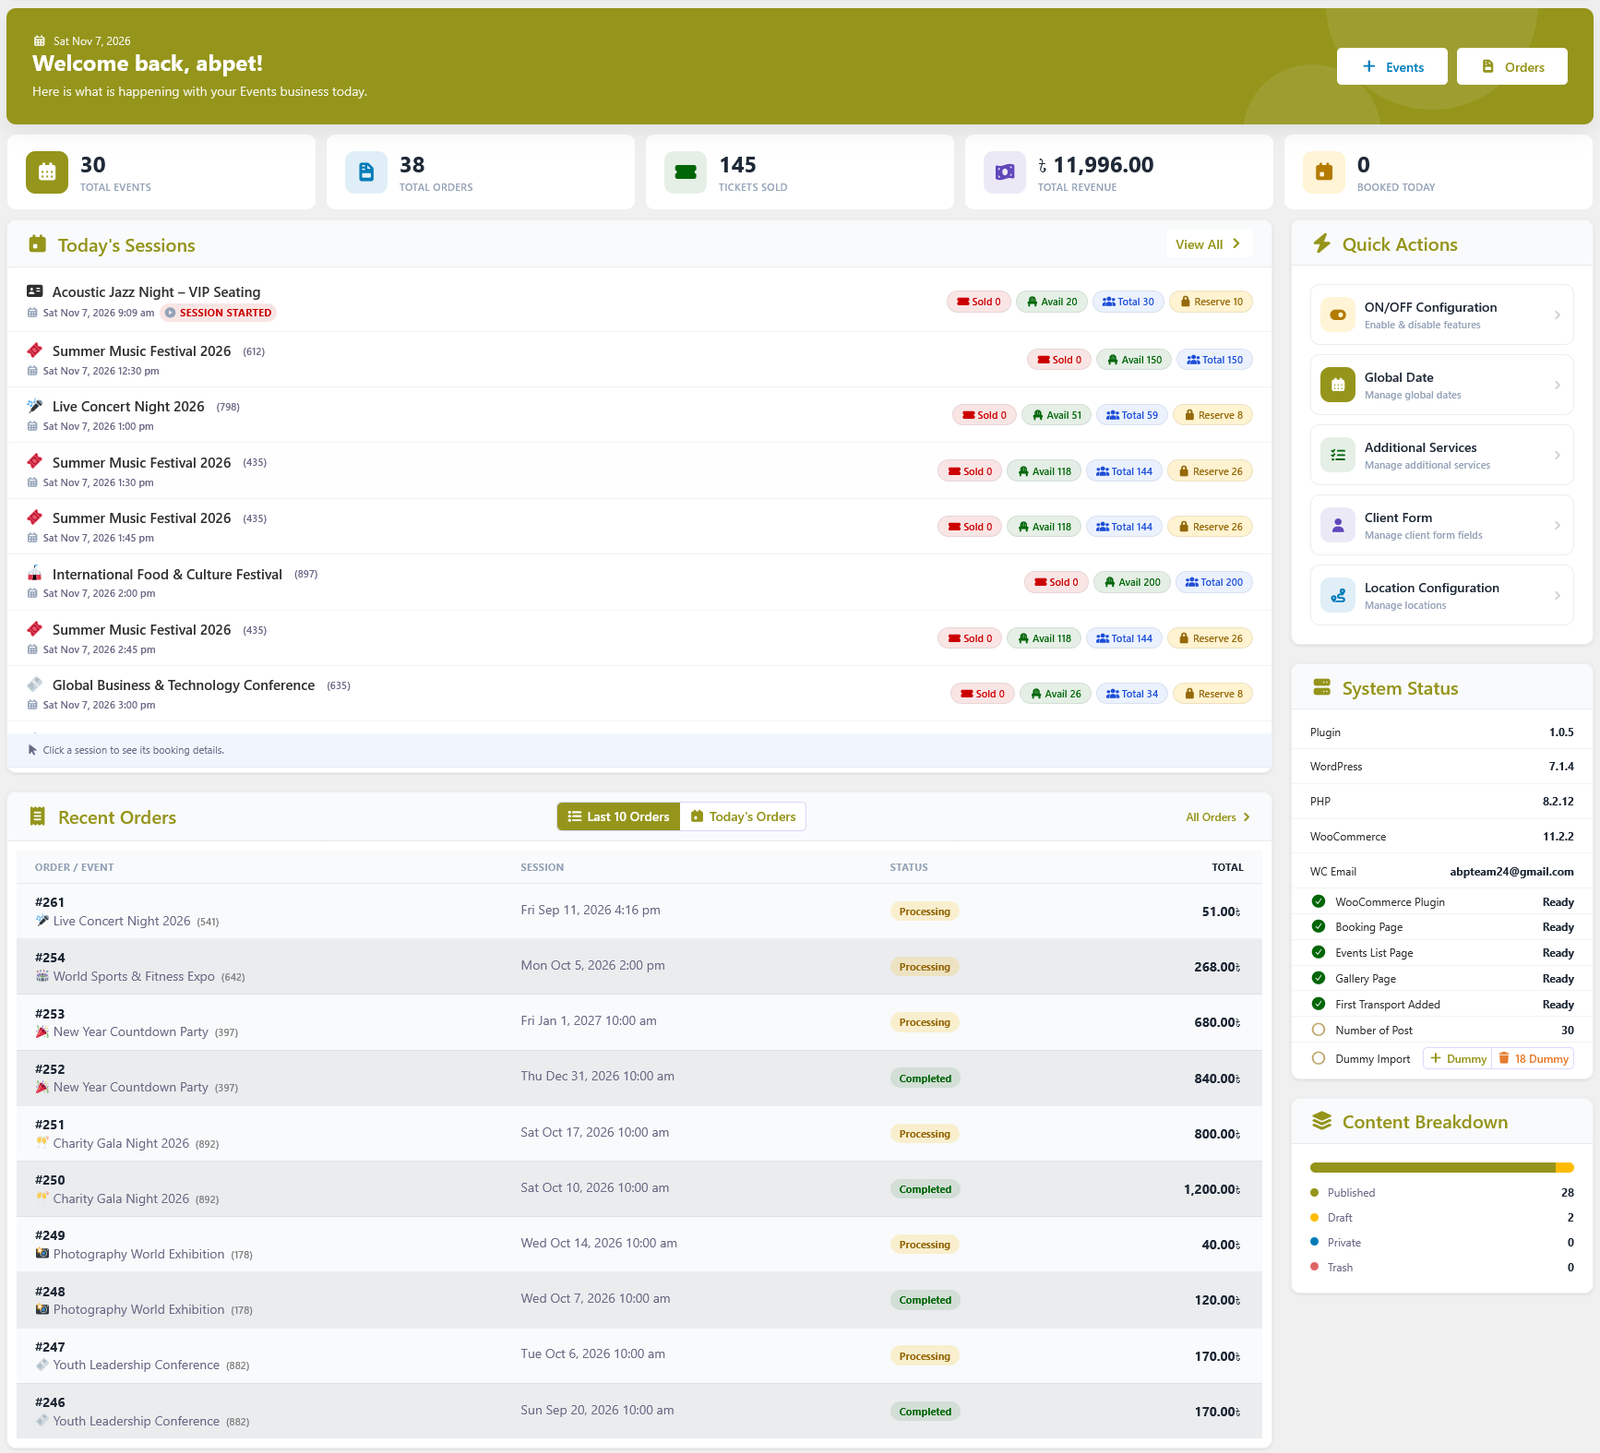
| Dashboard | Welcome screen with KPI cards, today's sessions, quick actions, recent orders, system status and content breakdown. |
| Events Lists | The event list, with a live event count in the tab. Create, edit, clone, view, trash, restore and permanently delete events. |
| Orders | All bookings with filters, ticket/seat details, statuses, billing and attendee information. The tab shows the total order count. |
| Add Order (PRO) | Create a booking manually for a customer by choosing the event, session, ticket or seat, and billing details. |
| Cancel Requests (PRO) | Review customer cancellation requests and approve or reject them. The tab shows the number of pending requests. |
| Ticket/Seat Plan | Global ticket types, decoration items and reusable seat plans with the seating designer. |
| Global Configuration | Plugin-wide settings and reusable data: labels and slugs, feature toggles, dates, ticket-related libraries, taxonomies, slider, contact details and CSS properties. When PRO is active it also includes PDF, Order Lists PDF, Order Lists CSV, E-Mail, Partial Payment and Global Discount settings. |
| Documentation | Built-in quick-start reference for the plugin. |
⚡ Quick actions
The header of every plugin screen includes shortcut buttons: create a new event, add a location, add a category (when enabled), and on the Dashboard a row of quick actions for the most-used configuration screens.
📊 Dashboard
The Dashboard is the landing screen of ABP Event Ticket. It gives you a quick overview of your event activity and shortcuts into the most frequently used areas of the plugin.
👋 Header
The header greets the current user by name, shows today's date, and provides two buttons: create a new event and open Orders.
🔢 KPI cards
| Card | Shows |
|---|---|
| Total Events | The number of events. Clicking it opens the event list. |
| Total Orders | The number of bookings. Clicking it opens the Orders screen. |
| Tickets Sold | Total tickets sold across all events. |
| Total Revenue | Revenue formatted with the WooCommerce currency. |
| Booked Today | Bookings created today. |
🗓️ Today's Sessions
Lists the sessions scheduled for today, each with its event, time, sold/available counts and a status chip such as Session Started. Clicking a session opens a popup with the seat map or ticket-type breakdown, the totals (sold, available, total, reserve) and the bookings for that session. View All opens the Orders screen.
🧾 Recent Orders
Two tabs — Last 10 Orders and Today's Orders — show the order number and event, the booked session, the order status and the total. The Today's Orders tab loads more rows on demand, and All Orders opens the Orders screen.
⚡ Quick Actions
- ON/OFF Configuration — enable or disable features.
- Global Date — manage global date settings.
- Additional Services — shown when additional services are enabled.
- Attendee Form — shown when the attendee form is enabled.
- Location Configuration — manage locations.
🖥️ System Status
Shows the plugin, WordPress, PHP and WooCommerce versions, plus the WooCommerce sender name and email. A checklist verifies the WooCommerce plugin, the Booking page, the event list page, the Gallery page and whether an event exists, with a Fix action where applicable. The card also shows the number of posts and a Dummy Import control that can add or remove sample data.
📈 Content Breakdown
A bar and legend showing how many events are Published, Draft, Private and in the Trash.
📅 Event Lists
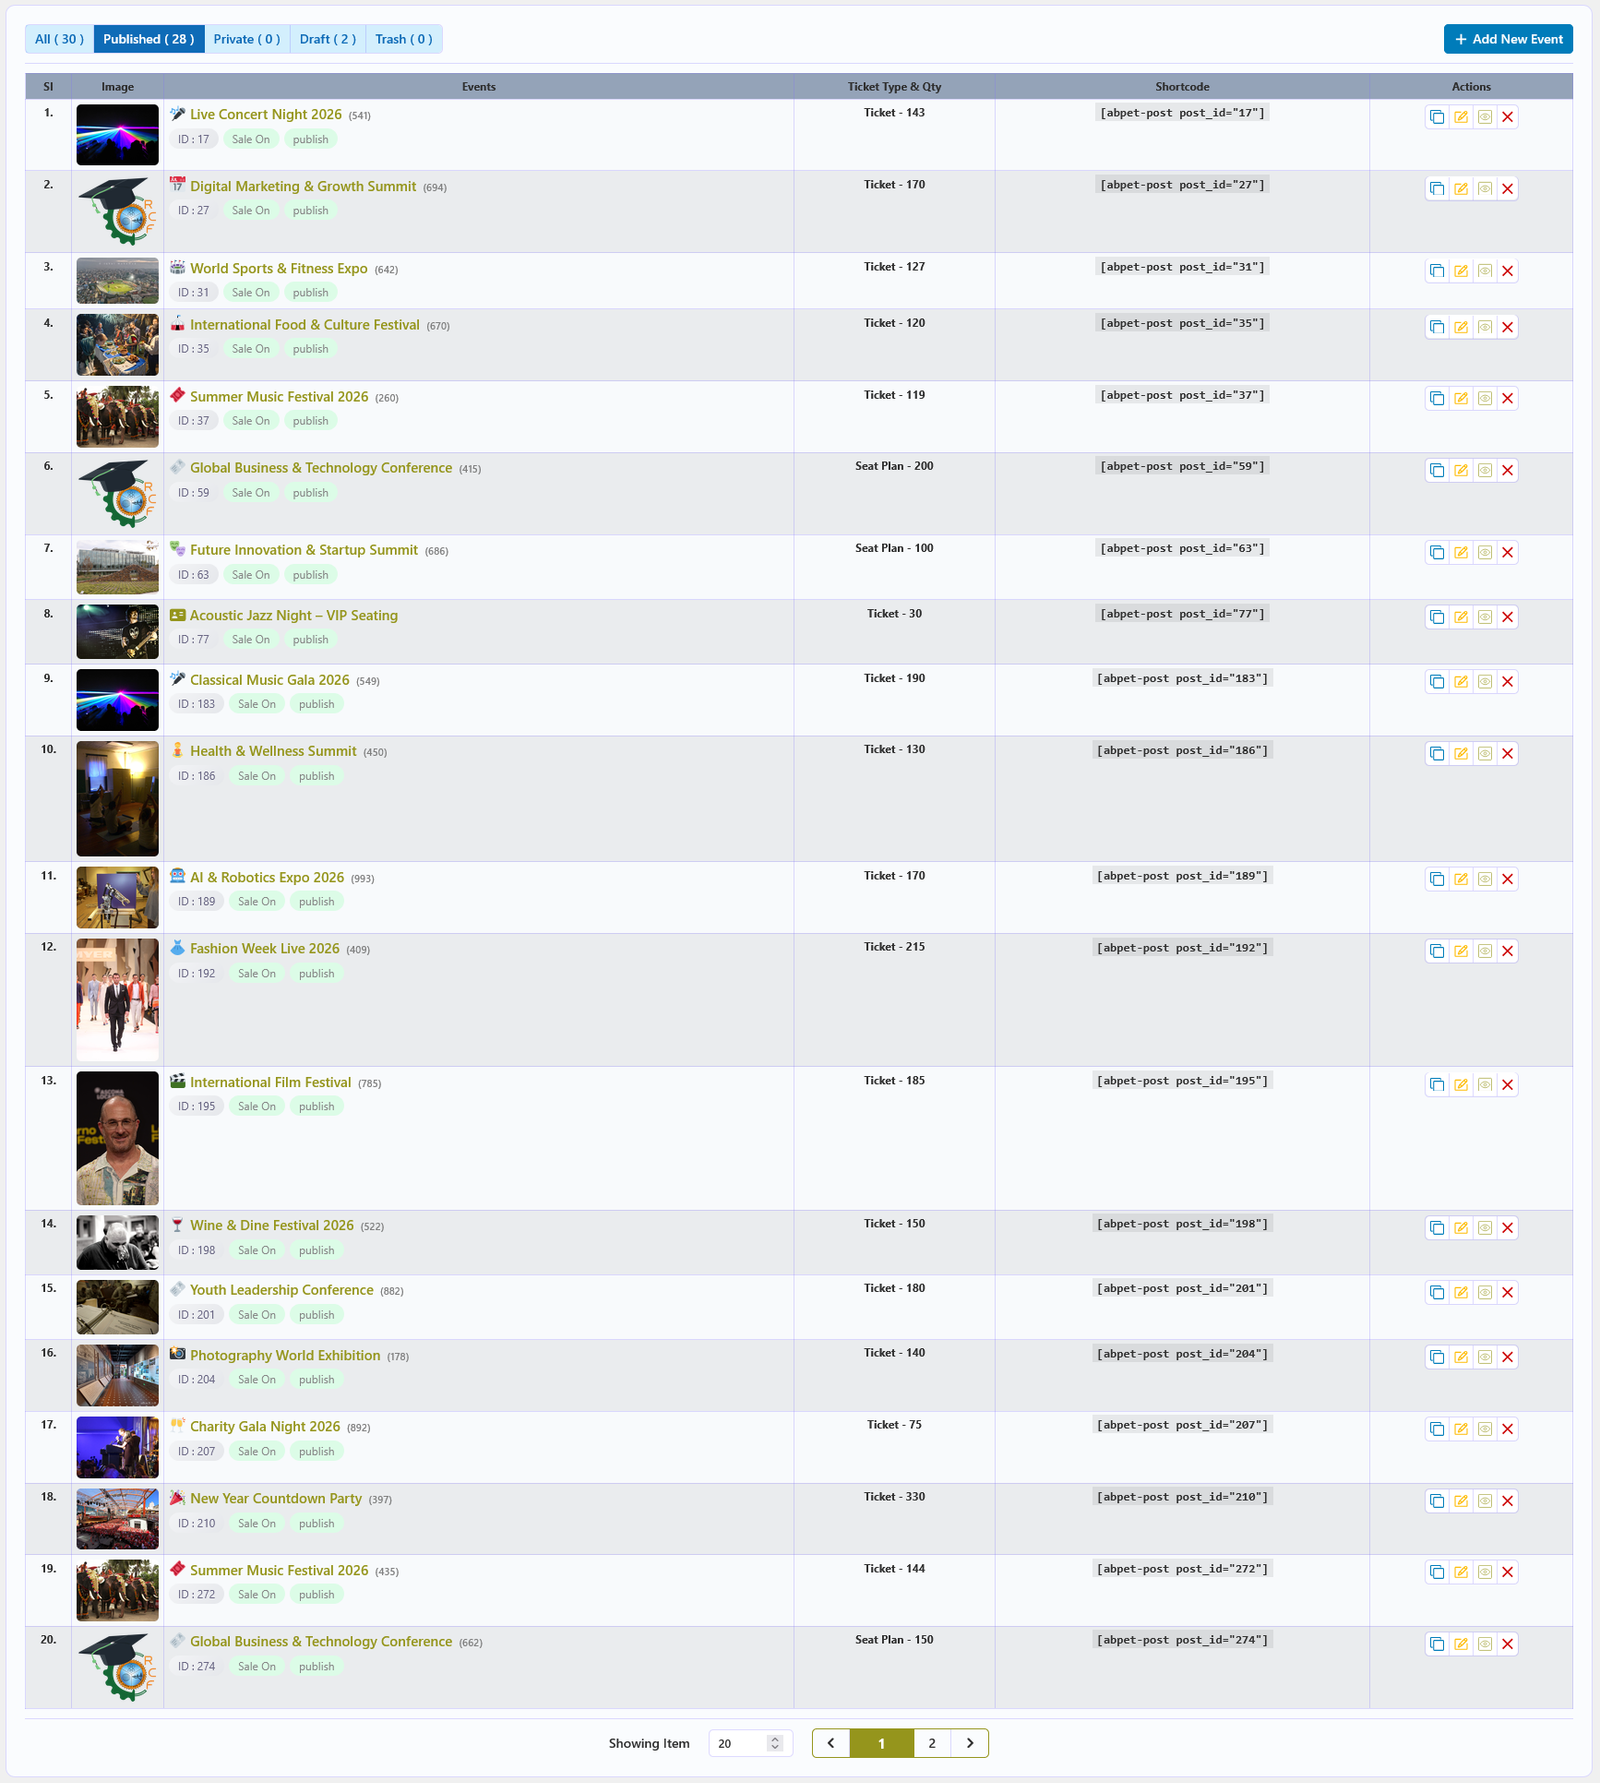
The Events Lists screen lists every event and provides the actions needed to create, edit, clone, view, trash, restore and permanently delete events. The tab label follows the Label set in Global Configuration.
📋 The event list
Status buttons at the top filter the list: All, Published, Private, Draft and Trash, each with a count. The table shows the event image, title, ticket type and quantity, the event's own booking shortcode, and the action buttons. Long lists are split into pages.
⚡ Available actions
| Action | Description |
|---|---|
| Add New Event | Open a blank event editor. |
| Edit | Open the event editor to change its settings, tickets, dates and content. |
| Clone | Duplicate an event, including its configuration, to create a similar event quickly. |
| View | Open the event on the frontend as customers see it. |
| Move to Trash | Move the event to the trash without deleting it permanently. |
| Restore | Restore a trashed event. |
| Permanent Remove | Delete the event and its data completely. This cannot be undone. |
[abpet-post post_id="…"] for that event. Copy it into any
page to list or link that single event; use [abpet-booking post_id="…"] when you want its
booking form on its own page.
⚙️ General Configuration
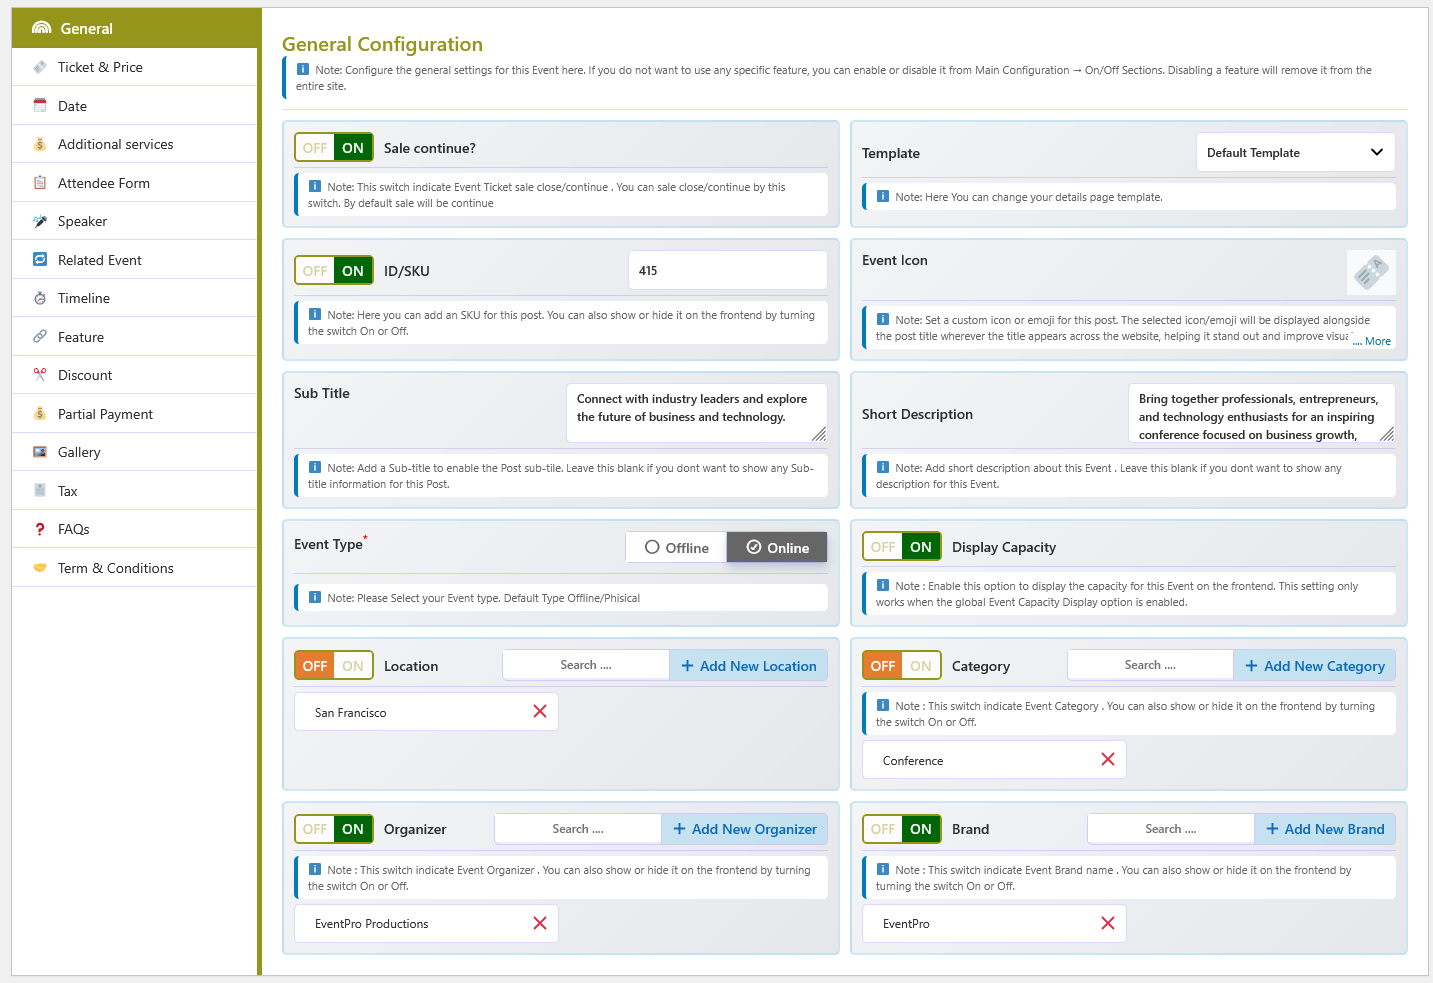
The General tab in the event editor provides centralized controls for the basic information and behavior of an event. Configure the template, SKU, icon, description, capacity display, event type, and taxonomies from a single section.
📋 Fields and options
| Option | Description |
|---|---|
| Sale Continue ON/OFF | Enables or disables ticket sales for this event. When enabled, customers can purchase according to the configured availability. |
| Template | Selects the details page template for this event: Default, Light, or Modern. |
| ID / SKU | A unique SKU or identifier for the event, with an option to display it on the frontend. |
| Event Icon | A custom icon or emoji shown alongside the event title. |
| Sub Title | A short subtitle for the event. Leave empty to hide it. |
| Short Description | A brief overview of the event for customers. |
| Event Type | Choose Offline or Online. This determines how the event location is presented. |
| Display Capacity ON/OFF | Shows or hides the event capacity on the frontend (works when the global capacity feature is enabled). |
| Location | Assign one or more locations and control their frontend display. New locations can be added inline. |
| Category | Assign categories and control their frontend display. |
| Organizer | Assign an organizer and control its frontend display. |
| Brand | Assign a brand and control its frontend display. |
| Related Event | Choose related events to promote on the event details page. |
| Feature | Add features to the event by selecting existing features or creating new ones. |
| Speaker | Assign one or more speaker profiles from the global speaker library, and switch Active Speaker? on or off to show or hide them. Shown when the Speaker feature is enabled. |
| Gallery | Add multiple images to build the event gallery and slider. |
🔗 Related events
Use Related Event to promote other events on the details page. Select one or more published events to show as related items.

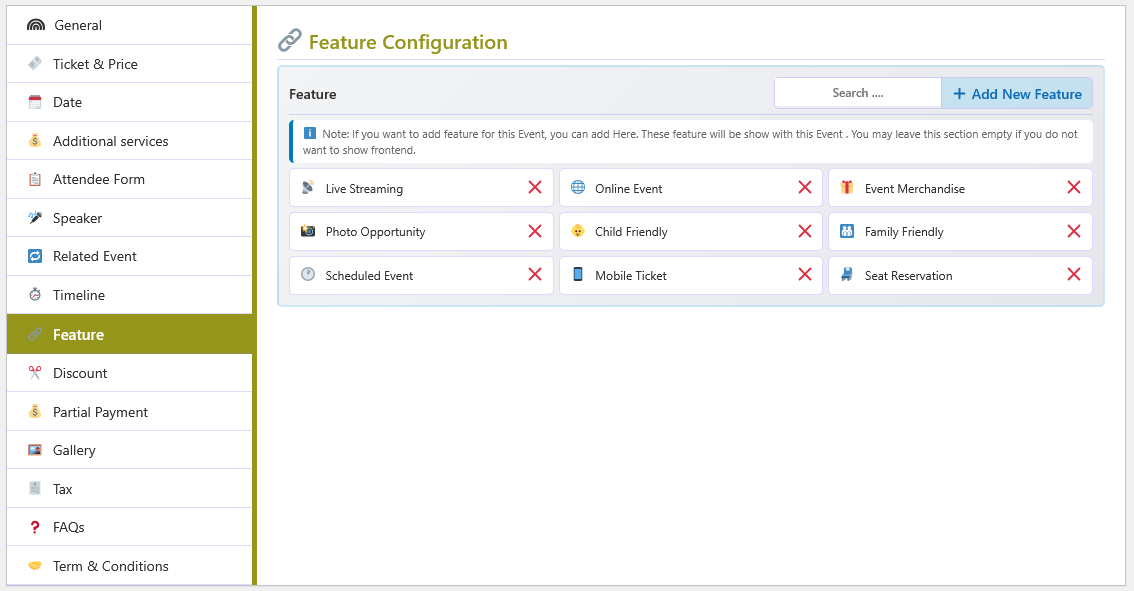
✨ Event features
Assign highlights from the Features library (or create new ones) so they appear on the event details page.
🎤 Speaker profiles
Speakers are created once under Global Configuration → Speakers and then assigned here. Each profile stores a name, photo, designation, company, bio, website and social links, and appears on the event details page while Active Speaker? is on.

🎫 Ticket & Price
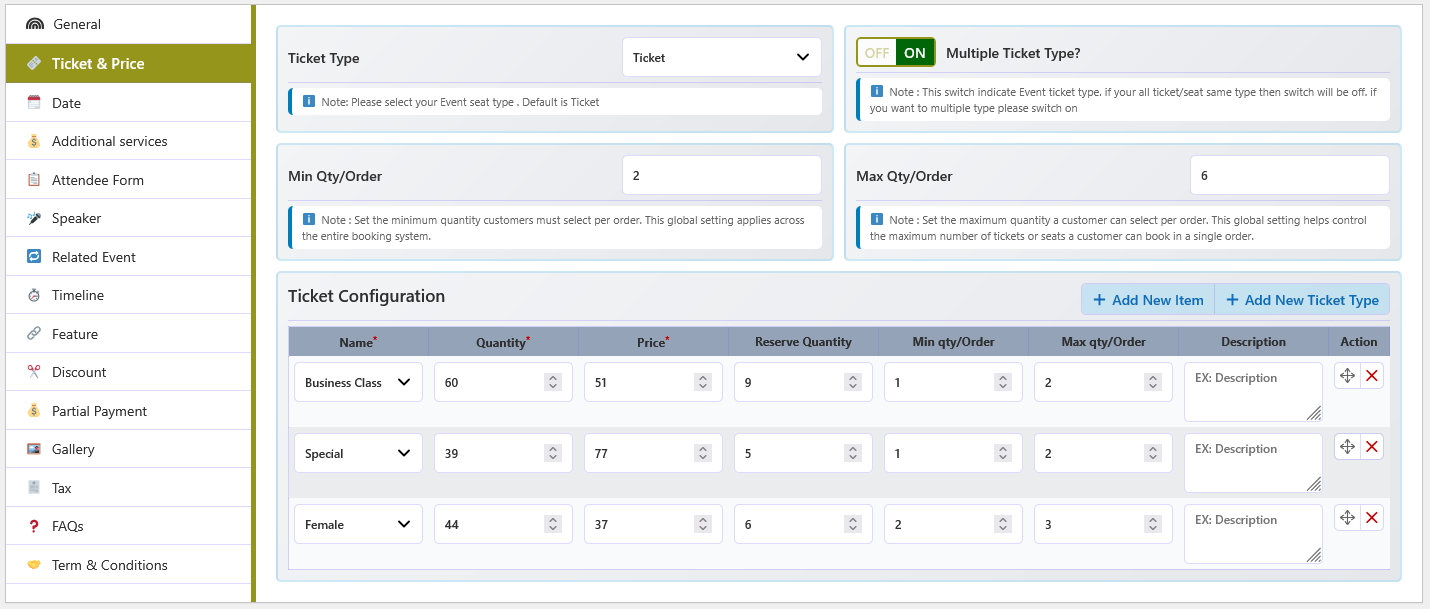
The Ticket & Price tab is where an event's sellable inventory is defined. Choose whether the event sells general admission tickets or reserved seats from a seat plan, then set the quantities and prices customers can book.
🎯 Ticket type mode
| Mode | Description |
|---|---|
| Ticket | General admission. You add ticket type rows and set a quantity and price for each one. |
| Seat Plan | Reserved seating. You attach one or more reusable seat plans to the event; seats and their ticket-type quantities come from the plan. This option appears when the Seat Plan feature is enabled under Feature ON/OFF. |
⚙️ Common settings
- Ticket Type — switches the event between Ticket and Seat Plan mode.
- Multiple Ticket Type? — when on, several ticket types can be sold for the event. When off, only a single ticket type is used.
- Min Qty/Order and Max Qty/Order — optional event-level booking limits, shown when the Min & Max qty feature is enabled.

🎟️ Ticket Configuration (general admission)
Each row is one ticket type offered for the event. Use Add New item for another row and Add New Ticket Type to create a reusable ticket type in the global library.
| Field | Description |
|---|---|
| Ticket Name | The reusable ticket type (for example Adult, Child, VIP) selected from the global ticket type list. |
| Quantity | The total number of tickets of this type offered for the event. Availability is calculated per session. |
| Price | The price charged for one ticket of this type. |
| Reserve Qty | Tickets held back from sale (for guest lists, staff, or offline sales). Reserved tickets reduce the quantity that can be sold. |
| Min Qty/Order | The minimum number of this ticket type a customer must select in one booking. |
| Max Qty/Order | The maximum number of this ticket type a customer may select in one booking. |
| Description | Optional text shown with the ticket type during booking. |
| Action | Drag to reorder rows, or delete a row. |
🪑 Seat Plan Configuration (reserved seating)
When Ticket Type is set to Seat Plan, the ticket rows are replaced by seat plan rows. The Total Seat counter at the top shows the combined seats of all attached plans.
- Add a seat label — click Add New Seat Label to add a row.
- Select the seat plan — choose one of the reusable plans from the Seat Plan Name list.
- Set the frontend name — enter the label customers see, for example Lower Deck.
- Check the quantities — Type Wise Quantity shows the seat counts per ticket type and Total Quantity shows the plan total. Both come from the plan and are read-only here.
- Set ticket prices — the small table beside the rows lists each ticket type with a price field.
- Save the event — the seat plan appears on the event details page for customers.
🛠️ Row actions
- View — open the seat plan preview.
- Sort — drag the row to change the order of plans on the frontend.
- Delete — detach the seat plan from this event. The global plan is not deleted.
link_wc_id)
to carry the cart, checkout, tax, coupon and payment flow. Ticket types are not separate WooCommerce products —
they are stored with the event and priced through that hidden product.
🗓️ Date Configuration
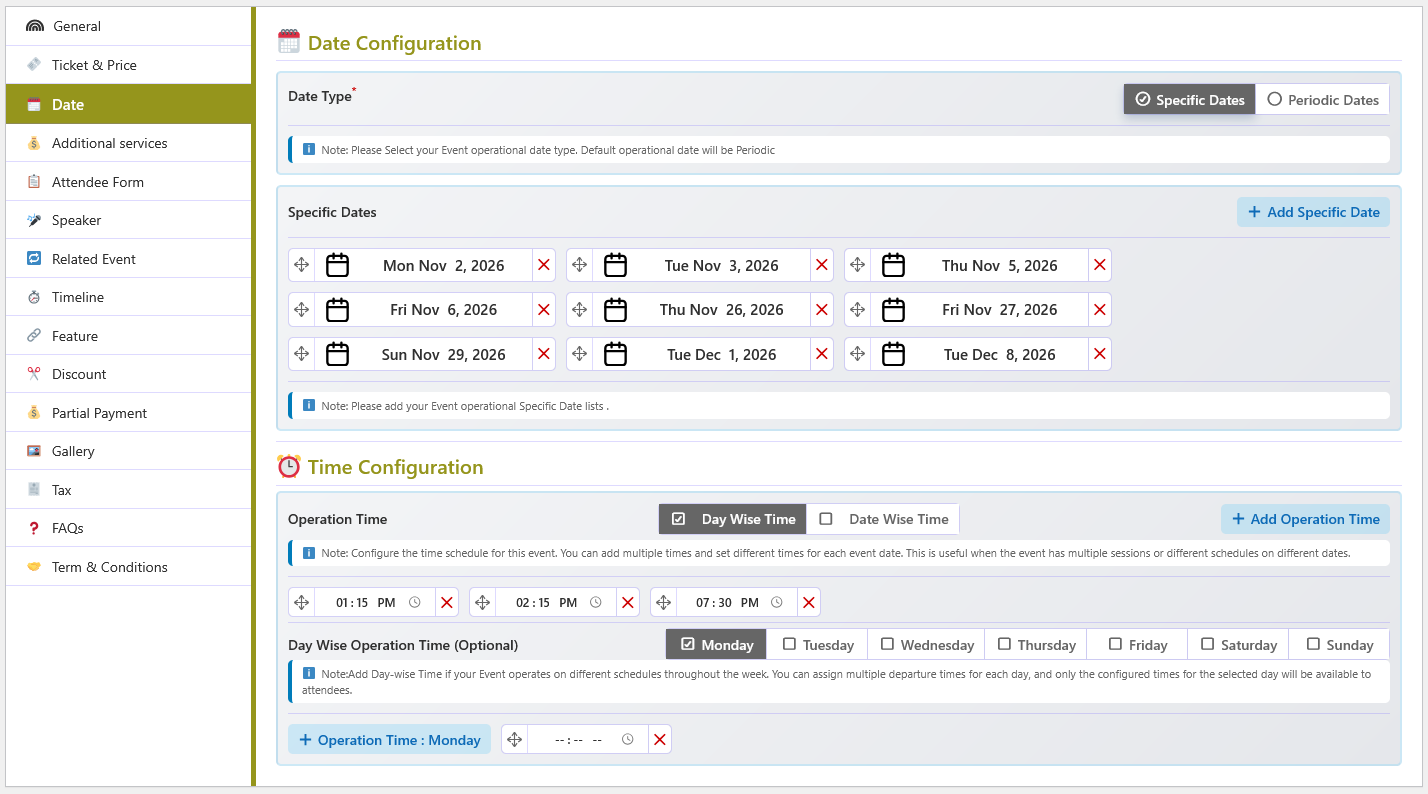
The Date tab defines when an event takes place and which sessions customers can book. Choose exact calendar dates, or let the plugin generate a recurring series of dates, then attach the session times that are offered on those dates.
🗓️ Date types
| Type | Description |
|---|---|
| Specific Dates | Add one or more exact dates with Add Specific Date. Use this for one-off performances or any irregular schedule. Each row can be edited or removed and the rows can be dragged to reorder them. |
| Periodic Dates | The plugin generates a series of dates automatically. The series starts at the Launching Date, repeats every Periodic after days, and stops at the Terminate Date (or after the global advance-booking window). It is a day interval, not a weekday selection. |
🔁 Periodic date settings
| Setting | Description |
|---|---|
| Periodic after | Gap between generated dates in days. 1 means every day, 2 means every
other day, and so on. |
| Launching Date | Optional first date of the series. When left empty the series starts from today. |
| Terminate Date | Optional last date of the series. When left empty the series is limited by the global Number of advance booking date setting. |

🚫 Special On/Off Dates
These rules apply to periodic dates and let you fine-tune the generated series:
- Weekend — select the weekdays that should be excluded from the series.
- Specific Off Dates — exclude individual calendar dates (holidays, closures).
- Special On Dates — force extra dates into the series even if they do not match the interval.
⏰ Time Configuration
| Option | Description |
|---|---|
| Operation Time | The session list offered on every date. Each row has a label (for example Morning, Evening) and a time. Use Add Operation Time for multiple daily sessions. |
| Day Wise Time | Optional per-weekday time override, for example different opening hours on weekends. |
| Date Wise Time | Optional per-date time override for specific calendar dates. |
🖥️ Date selection on the frontend
The booking form picks the right control automatically, based on how many dates are available:
| Available dates | Control shown |
|---|---|
| 1 date | The date is displayed as fixed text. When the event has a single session time it is shown with the date. |
| 2 – 7 dates | A compact select field. When session times exist, every option contains both the date and the session time. |
| 8 or more dates | A calendar date picker that only enables the available dates. |
The threshold is 7 by default and can be changed with the abpet_date_select_limit filter.
📦 Availability
- Sale-closing buffer — a global value in minutes. Booking closes that many minutes before a session starts.
- Advance booking days — a global value that controls how many days of periodic dates are generated.
- Stock — ticket quantity, sold and reserved counts are tracked per ticket type and per session, not per date row.
- Event Date and Time List — the Feature ON/OFF toggle that shows or hides the date/time list on the event details page.
✂️ Event Discounts PRO
Set date-range discount rules for an individual event. Seasonal and Early Bird rules are separate and can be enabled independently.
Configure discounts for one event
- Edit the event and open its Discount tab.
- Turn on the Seasonal Discount or Early Bird Discount switch you want to configure.
- Add a date range and enter the discount percentage. Add more rows for additional ranges.
- Save or update the event. Repeat for other events as needed.

Global rules are configured separately under Global Configuration → Global Discount. Event-specific rules are stored with that event and do not require enabling the global-discount switches.
💰 Event Partial Payment PRO
Allow customers booking this event to pay a deposit at checkout and settle the remaining balance later.
Set an event payment amount
- Edit the event and open its Partial Payment tab.
- Enable Pay Partial Amount at Checkout?.
- Select a percentage or fixed amount, enter the value, then save the event.
- At checkout, customers can choose to pay in full or pay the partial amount if the event's settings allow it.
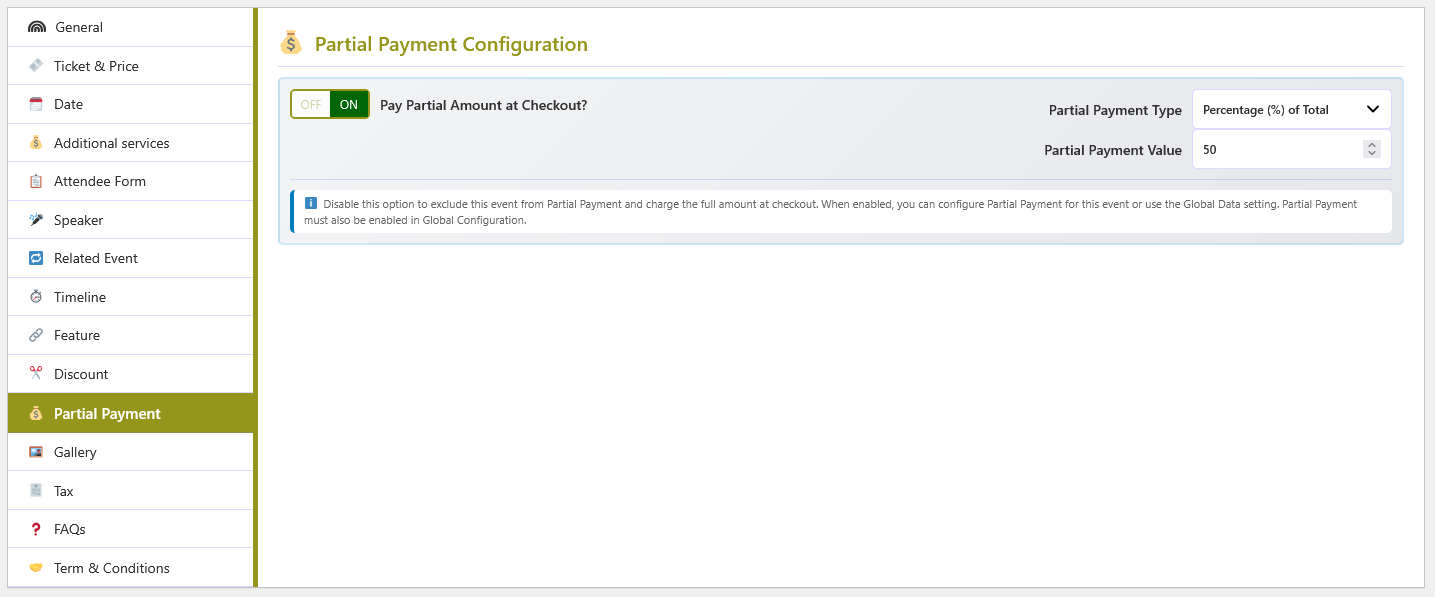
The order records the deposit and balance. Customers can review the amount due and pay it from WooCommerce My Account. Administrators can also record a balance payment from the order tools.
🕒 Timeline
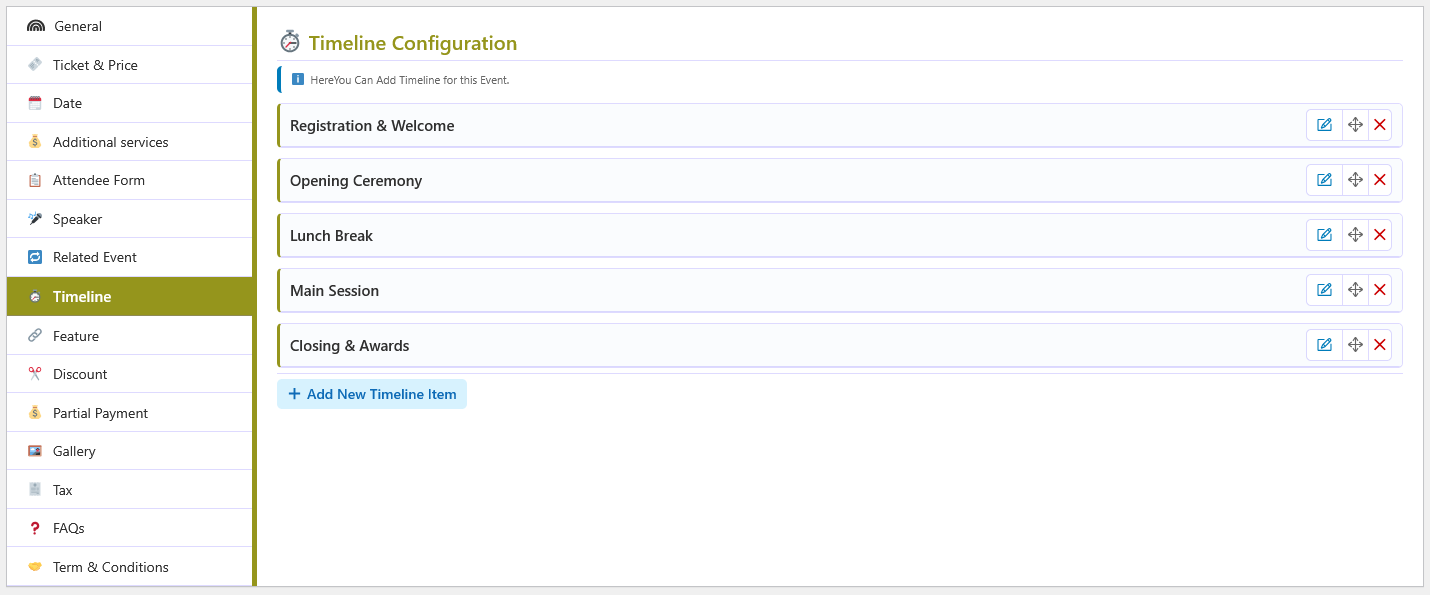
The Timeline publishes a chronological schedule of activities for an event. Each entry appears on the event details page, giving attendees a clear run-down of the day.
🔀 Active Timeline
Active Timeline? turns the timeline on for this event. When it is off, the entry list is hidden and nothing is shown on the frontend. The whole tab only exists while the Event Timeline feature is enabled under Feature ON/OFF.
➕ Adding an entry
- Add New Timeline Item — adds a collapsible entry.
- Time — the time the activity begins, for example
10:00 AM. - Title — a short, descriptive title. Required; entries without a title are not saved.
- Description — an optional rich-text description with media support.
- Repeat and save — add as many entries as needed, drag to reorder, then save the event.
📋 Entry fields
| Field | Description |
|---|---|
| Time | Free-text start time of the activity. |
| Title | A short label for the activity. |
| Description | Rich-text details of what happens at that time. |
➕ Additional Services
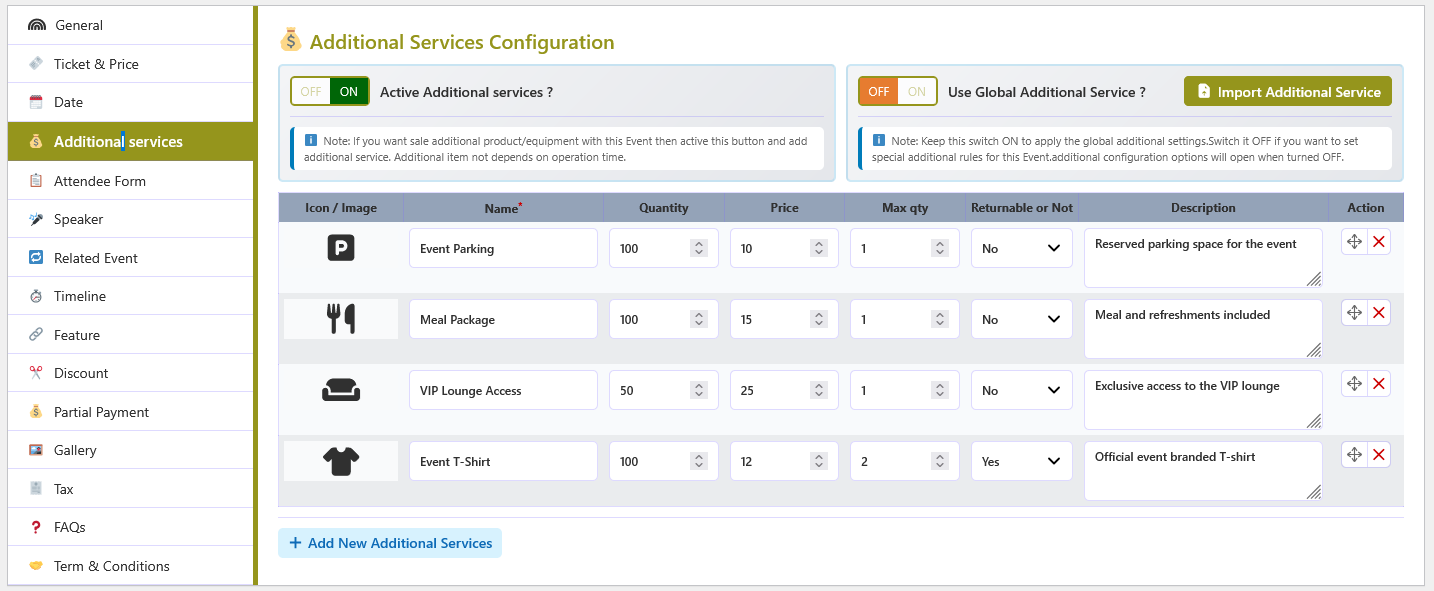
Additional services are optional extras customers can add to a booking — for example parking, a meal, or a programme. The Additional services tab decides whether the event offers extras, and which ones.
🔀 Event toggles
| Option | Description |
|---|---|
| Active Additional services? | Turns additional services on for this event. When off, the service table is hidden and no extras are offered. |
| Use Global Additional Service? | When on, the event uses the services defined in the global library and the table is hidden. Turn it off to define a custom list for this event. |
| Import Additional Service | Shown when Use Global Additional Service? is off. Copies the global services into the event, where they can then be edited. |
📋 Service table
When the event keeps its own list, the table has the same columns as the global library:
| Column | Description |
|---|---|
| Icon / Image | Optional icon or image for the service. |
| Name | The service name (required). |
| Quantity | Quantity offered for this event. |
| Price | Price per unit added to the booking total. |
| Max qty | Maximum quantity per booking. |
| Returnable or Not | Whether the item can be returned. |
| Description | Optional text shown with the service. |
| Action | Drag to reorder, or delete the row. |
Click Add New Additional services to add a row. Save the event to store the list.
🧾 Attendee Form
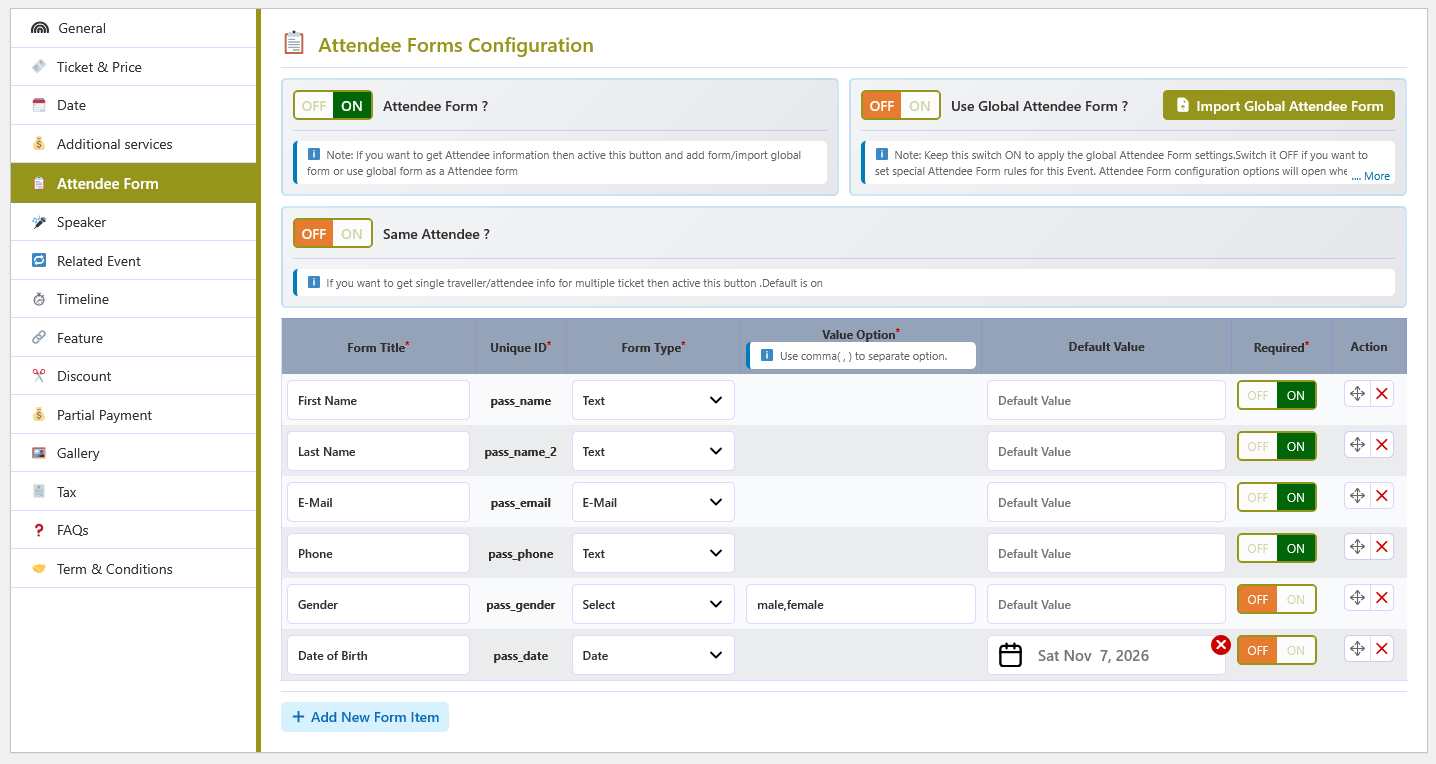
The Attendee Form collects information from attendees at checkout. Add the fields you need — such as name, email, phone, or custom questions — and the data is stored with the booking.
🔀 Event toggles
| Option | Description |
|---|---|
| Attendee Form? | Turns the attendee form on for this event. When off, no attendee fields are requested. Shown when the Attendee Form feature is enabled. |
| Use Global Attendee Form? | When on, the event uses the fields from the global library and the table is hidden. Turn it off to build a custom form for this event. |
| Import Global Attendee Form | Shown when Use Global Attendee Form? is off. Copies the global fields into the event so they can be edited. |
| Same Attendee? | When on, one set of attendee details is collected for the whole booking. Shown only when the Same Attendee feature is enabled. |
📋 Form fields
| Column | Description |
|---|---|
| Form Title | The label shown to the customer. Required. |
| Unique ID | The field key used to store the answer. Required and must be unique. |
| Form Type | Text, E-Mail, Number, Select, Checkbox, Radio, Textarea or Date. |
| Value Option | Choices for Select, Checkbox and Radio fields. |
| Default Value | Optional pre-filled value, or the default date for a Date field. |
| Required | Whether the customer must complete the field. |
| Action | Drag to reorder, or delete the field. |
Use Add New Form Item to add a field. Save the event to store the form.
🧾 Tax
The Tax tab sets the WooCommerce tax status and tax class used by this event's ticket products. The tab mirrors the standard WooCommerce product tax fields.
🔧 Tax Status
| Value | Meaning |
|---|---|
| Please Select | The default placeholder. No explicit status is chosen, so WooCommerce's standard behaviour applies. |
| Taxable | Tax is calculated on the ticket price. |
| Shipping only | Tax applies to shipping only, not to the ticket price. |
| None | No tax is applied to this ticket. |
🏷️ Tax Class
Choose Standard, or any additional tax class that exists in WooCommerce. The list is built from the site's tax classes, so custom classes appear here automatically. To add a new class, go to WooCommerce → Settings → Tax.
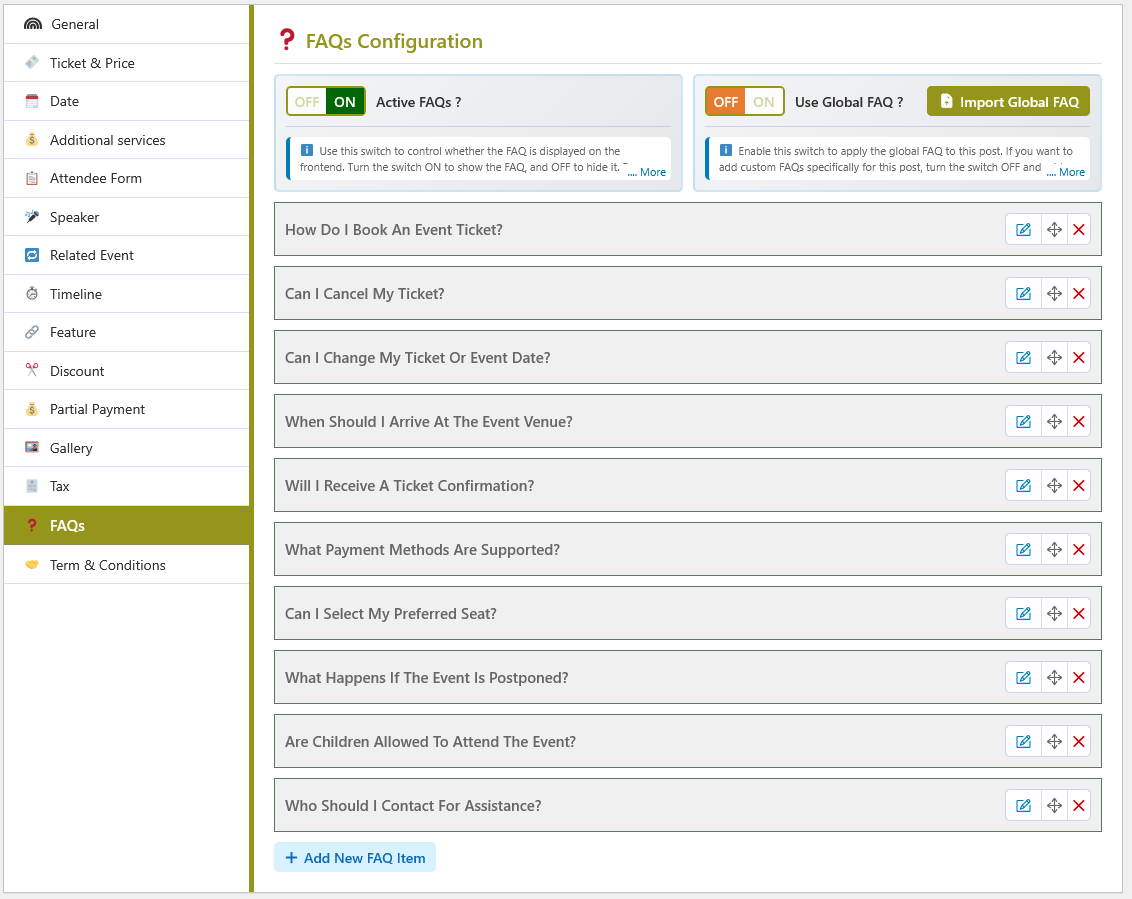
❓ FAQs
The FAQs tab of the event editor controls the frequently asked questions shown on that event's details page. You can reuse the Global FAQ library, or write a custom set for this event only.
🔀 Display switches
| Option | Default | Description |
|---|---|---|
| Active FAQs ? | ON | Shows or hides the FAQ section on the frontend for this event. When it is turned off, no FAQs are saved for the event. |
| Use Global FAQ ? | ON | Applies the shared FAQ list from Global Configuration → FAQ. Turn it off to add a custom FAQ list for this event only. |
| Import Global FAQ | - | A button that copies the global FAQ items into this event. It appears only when Use Global FAQ is off, and the imported items stay editable and deletable. |
✍️ Adding a custom FAQ
- Turn off Use Global FAQ - This reveals the event's own FAQ list and the import button.
- Click Add New FAQ Item - A new collapsed FAQ row is added.
- Edit the row - Use the pencil button to open the title and description fields.
- Enter the FAQ Title - Required. It also becomes the row heading while collapsed.
- Write the Description - Required. A rich-text editor with media and quicktags support.
- Sort or remove rows - Drag rows to reorder, use the trash button to delete, and save the event to store the list.
📜 Terms & Conditions
The Term & Conditions tab attaches event-specific terms — refund rules, entry requirements, age restrictions and similar policies. The content is shown on the event details page.
🔀 Event toggles
| Option | Description |
|---|---|
| Active Term & Conditions? | Turns the terms on for this event. When off, the content is hidden and not shown on the frontend. |
| Use Global Term & Conditions? | When on, the event displays the terms saved in the global library and the editor is hidden. Turn it off to write event-specific terms. |
| Import Global Term & Conditions | Shown when Use Global Term & Conditions? is off. Copies the global content into the event editor so it can be edited. |
✍️ Content
The editor accepts rich text, links, lists and media. It is only active when the event keeps its own terms (that is, when Use Global Term & Conditions? is off). Save the event to store the content.

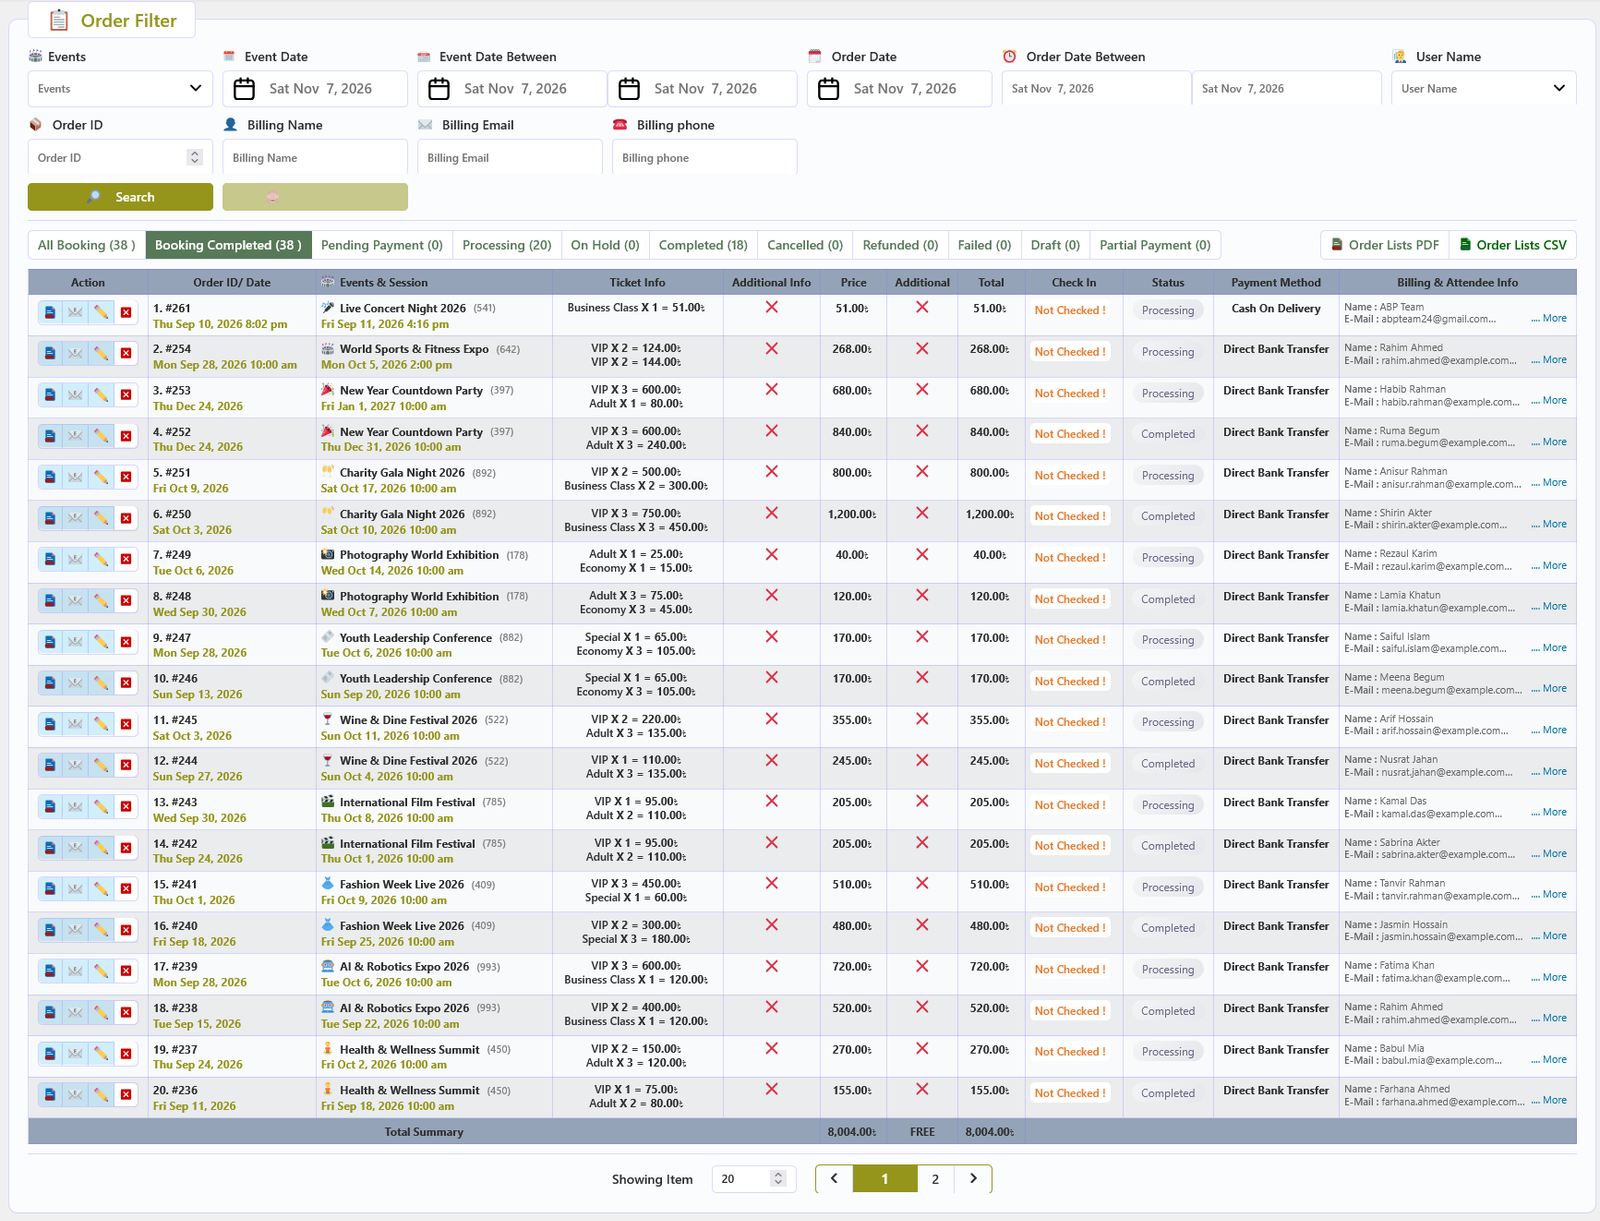
🧾 Orders
The Orders screen lists every booking made through the plugin. Each row shows the order, its event session, the tickets and extras purchased, the amounts, the status, payment method, billing details and the attendee data collected by the Attendee form.
🔎 Filtering
Use the search field and More Options to narrow the list by order, event, status, date or customer. The footer row shows the total price, additional total and grand total for the filtered results.
📋 Columns
| Column | Description |
|---|---|
| Action | Cancel a booking. The cancel button is shown only when the order is in one of the statuses selected under Global Configuration → Events → Booked Status. |
| Order ID / Date | The order number and the date the booking was created. |
| Event | The event title, with its icon and SKU when those features are enabled. |
| Event Date / Session | The booked date and session time. |
| Ticket Info | The ticket types and quantities, plus the seat plan and seat numbers when reserved seating is used. |
| Additional Info | Additional services purchased (shown when Additional Services is enabled). |
| Price / Additional / Total | Ticket total, additional-services total and the order total. |
| Status | The current order status. |
| Payment Method | The gateway used for the order. |
| Billing Info | Billing name, address and contact details, expandable with More. |
| Attendee Info | The attendee data collected by the Attendee form (shown when Attendee Form is enabled). |
🛠️ Admin Booking Tools PRO
Create bookings for customers or edit existing booking information from the Event Ticket administration area.
Create a booking
- Open the Event Ticket admin screen and choose Add Order.
- Find and select the event, then complete the event date/session and ticket or seat choices in the booking form.
- Enter the customer's billing/contact details and any attendee or additional-service information requested by the event.
- Choose the appropriate order status/payment state and submit the booking.
- Review the created order in Orders. If booking email is configured, an email may be sent to the customer.
Edit an existing booking/order
- Open Orders and find the booking you need to change.
- Use its Edit Booking action. This action is available to administrators for bookings whose status is included in the configured booked statuses.
- Update the event date/session, ticket quantities or seat selection, attendee information, additional services, billing details, or order status as needed.
- Save the booking and review the updated order total and booking details. The total is recalculated from the selected event/session and tickets.
🚫 Customer Cancellation Requests PRO
Let customers request cancellation from WooCommerce My Account, with an administrator making the final decision.
Enable and set the cutoff
- Enable Customer Cancel Request in Global Configuration → Feature ON/OFF.
- Open Cancel Requests in the Event Ticket admin navigation.
- Choose the number of hours or days before the event starts when requests must stop, then save.
- Customers submit requests from their WooCommerce My Account booking area while the event is outside the cutoff window.
Review requests
The Cancel Requests page lists pending requests, including the booking, event/session, requester, and request time. Approve a request to cancel that booking and release its tickets/seats; reject it to keep the booking active.
✅ Check-in & Session Statistics PRO
Validate booking tickets at event entry and review ticket sales and revenue by event session.
Prepare the check-in page
- Use the Event Ticket dashboard's Ticket Download Page status action to create the page if needed.
- Confirm the page contains
[abpet-ticket]and publish it. - Have staff sign in before searching for a ticket. The page supports ticket lookup/check-in; users must have permission to access the booking.
- Use the booking's check-in action in the admin booking list when managing entry from the dashboard.
Individual booking PDFs can include a QR code that points to the ticket page. Enable QR Code? under Global Configuration → Feature ON/OFF; PDF generation requires ABP PDF Tools. See Ticket QR Codes for setup and scanning guidance.
View session statistics
In the Event list, select an event's Statistics action. Choose a session date/time to review booking records, sold ticket quantities, seat information, availability, and revenue for that session.
🪑 Ticket/Seat Plan
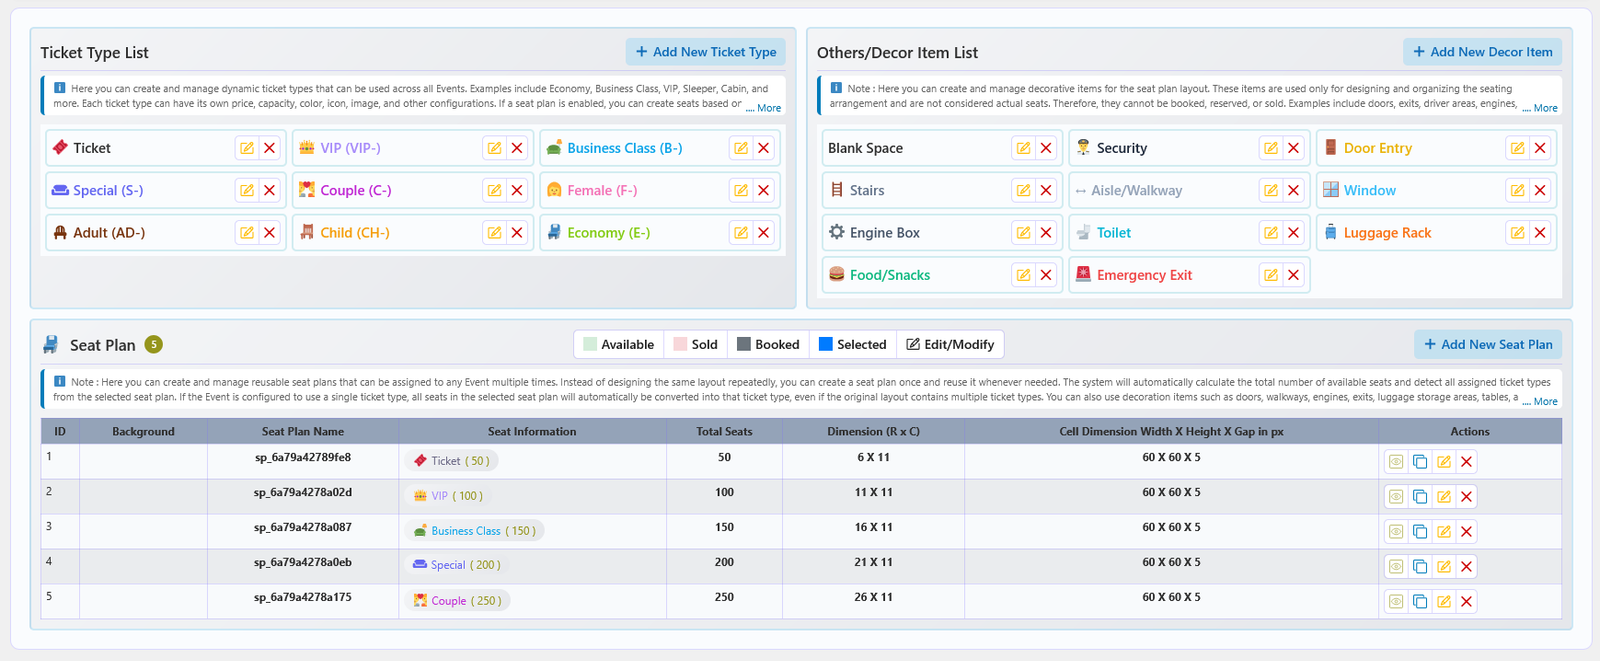
The Ticket/Seat Plan screen is the global library for ticket types, decoration items and reusable seat plans. Configure a ticket type or design a seating layout once here, then attach it to any number of events.
📚 Three sections on one screen
| Section | Purpose |
|---|---|
| Ticket Type List | Reusable ticket or seat types with a name, colour, prefix and optional image, icon or emoji. Use Add New Ticket Type to open the editor. |
| Others/Decor Item List | Reusable non-seat elements for the seating canvas, such as doors, stairs, aisles, windows or luggage racks. |
| Seat Plan | The list of saved seating layouts and the builder used to create or edit them. |
🎟️ Ticket types
A ticket type row stores an image/icon, a ticket name, a colour and a prefix. These settings are applied automatically to every seat assigned to that type and are used throughout the booking process for consistent identification.
- Drag rows to change their order.
- Use the delete icon to remove a ticket type.
- Click Save Ticket Types to store the list.
🧱 Decor items
Decor items use the same structure — image/icon, decor name and colour — and can be placed on a seat plan canvas to mark non-seatable areas.
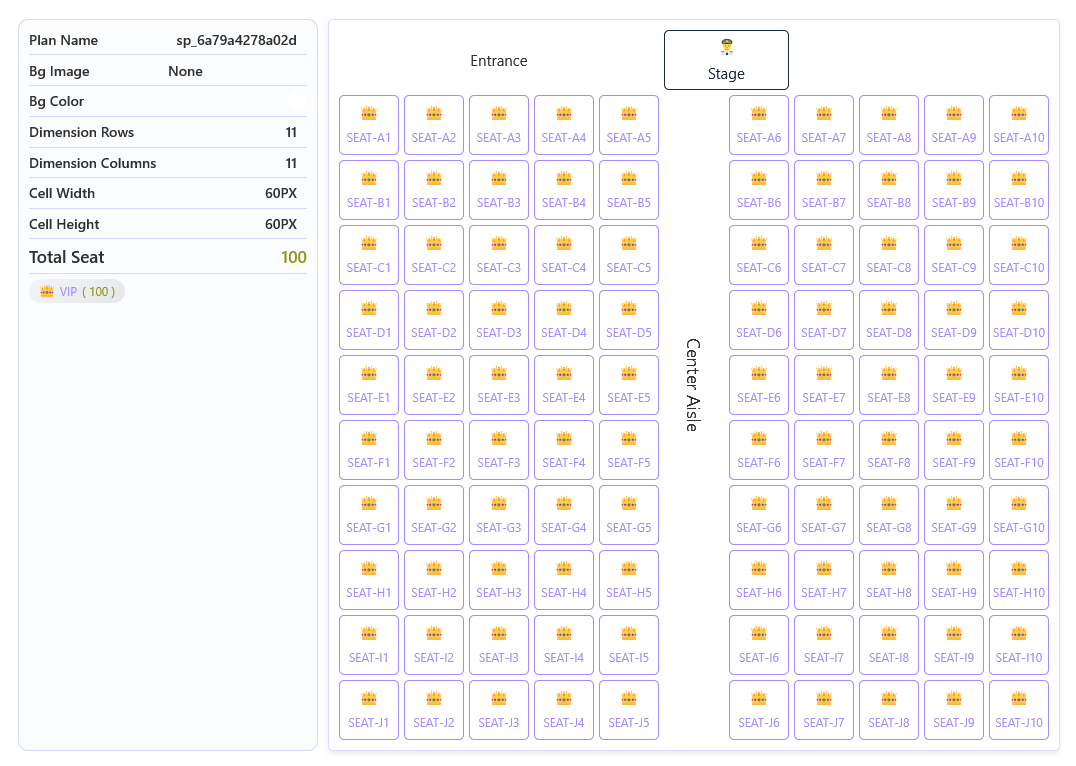
📋 Seat plan list
| Column | Description |
|---|---|
| ID / Background | The plan ID and its background image, when one is set. |
| Seat Plan Name | The name used when attaching the plan to an event. |
| Seat Information | Ticket-type breakdown of the plan, with the seat count for each type. |
| Total Seats | The total number of seats in the plan. |
| Dimension (R x C) | Rows × columns of the seating grid. |
| Cell Dimension | Cell width × height × gap in pixels. |
| Actions | View (preview), Clone (copy the plan), Edit and Permanent Remove. |
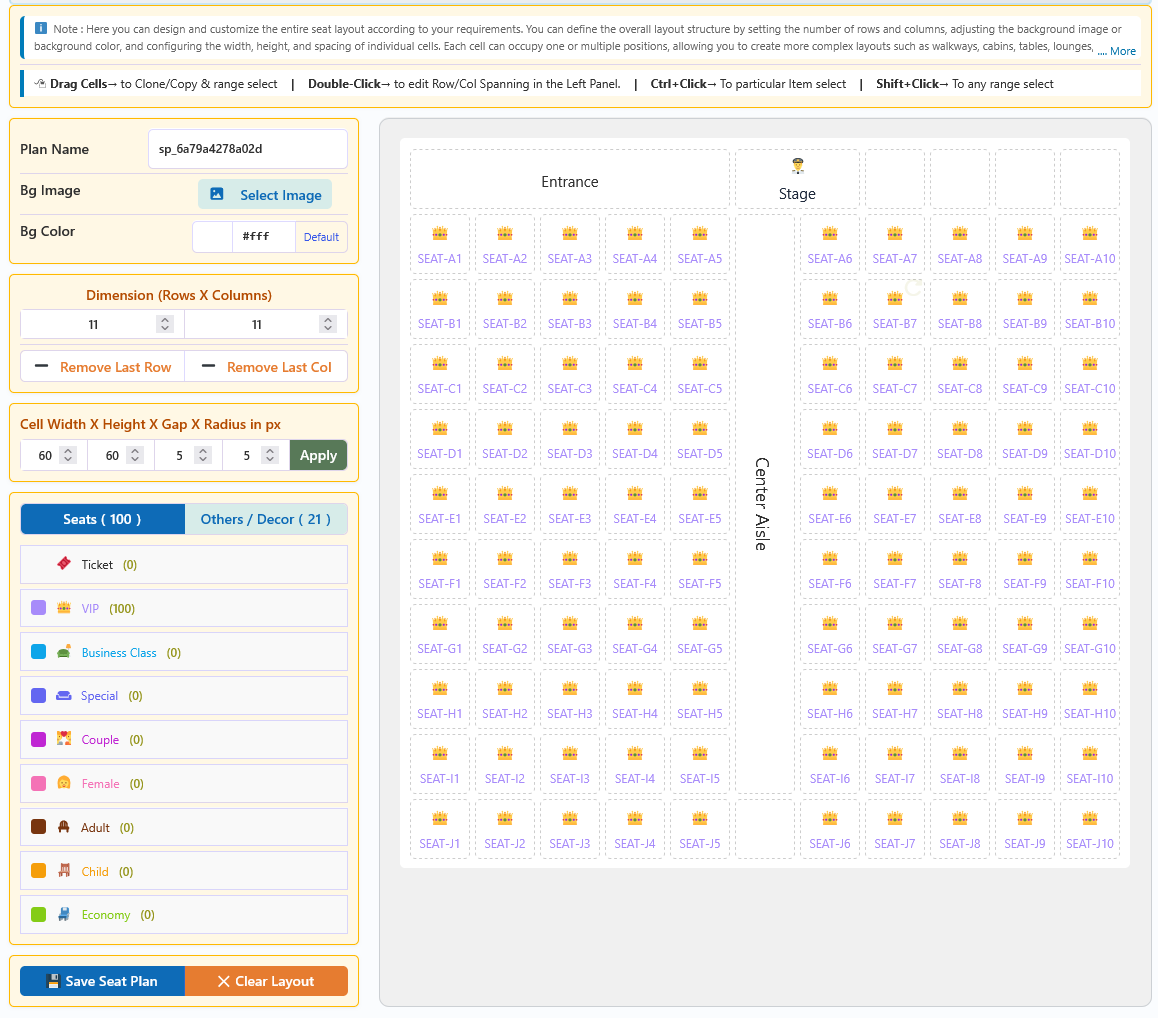
🛠️ Building a seat plan
- Add New Seat Plan — click the button above the list to open the builder.
- Name the plan — enter a descriptive Plan Name.
- Set the background — optionally choose a background image and background colour.
- Set the dimension — enter the number of rows and columns. Use Remove Last Row and Remove Last Col to trim the grid.
- Adjust the cells — set cell width, height, gap and radius, then click Apply.
- Design cells — select cells and use Cell Control to set column/row spanning, custom text and font size.
- Assign types — place seats and decor items from the Seats and Others / Decor tabs onto the canvas.
- Save — click Save Seat Plan. The plan is now available to attach to events.
🖱️ Builder shortcuts
- Drag cells — clone/copy cells and select a range.
- Double-click — edit row/column spanning in the left panel.
- Ctrl + Click — select an individual item.
- Shift + Click — select a range of items.
- Clear Layout — empty the canvas and start again.
⚙️ Global Configuration
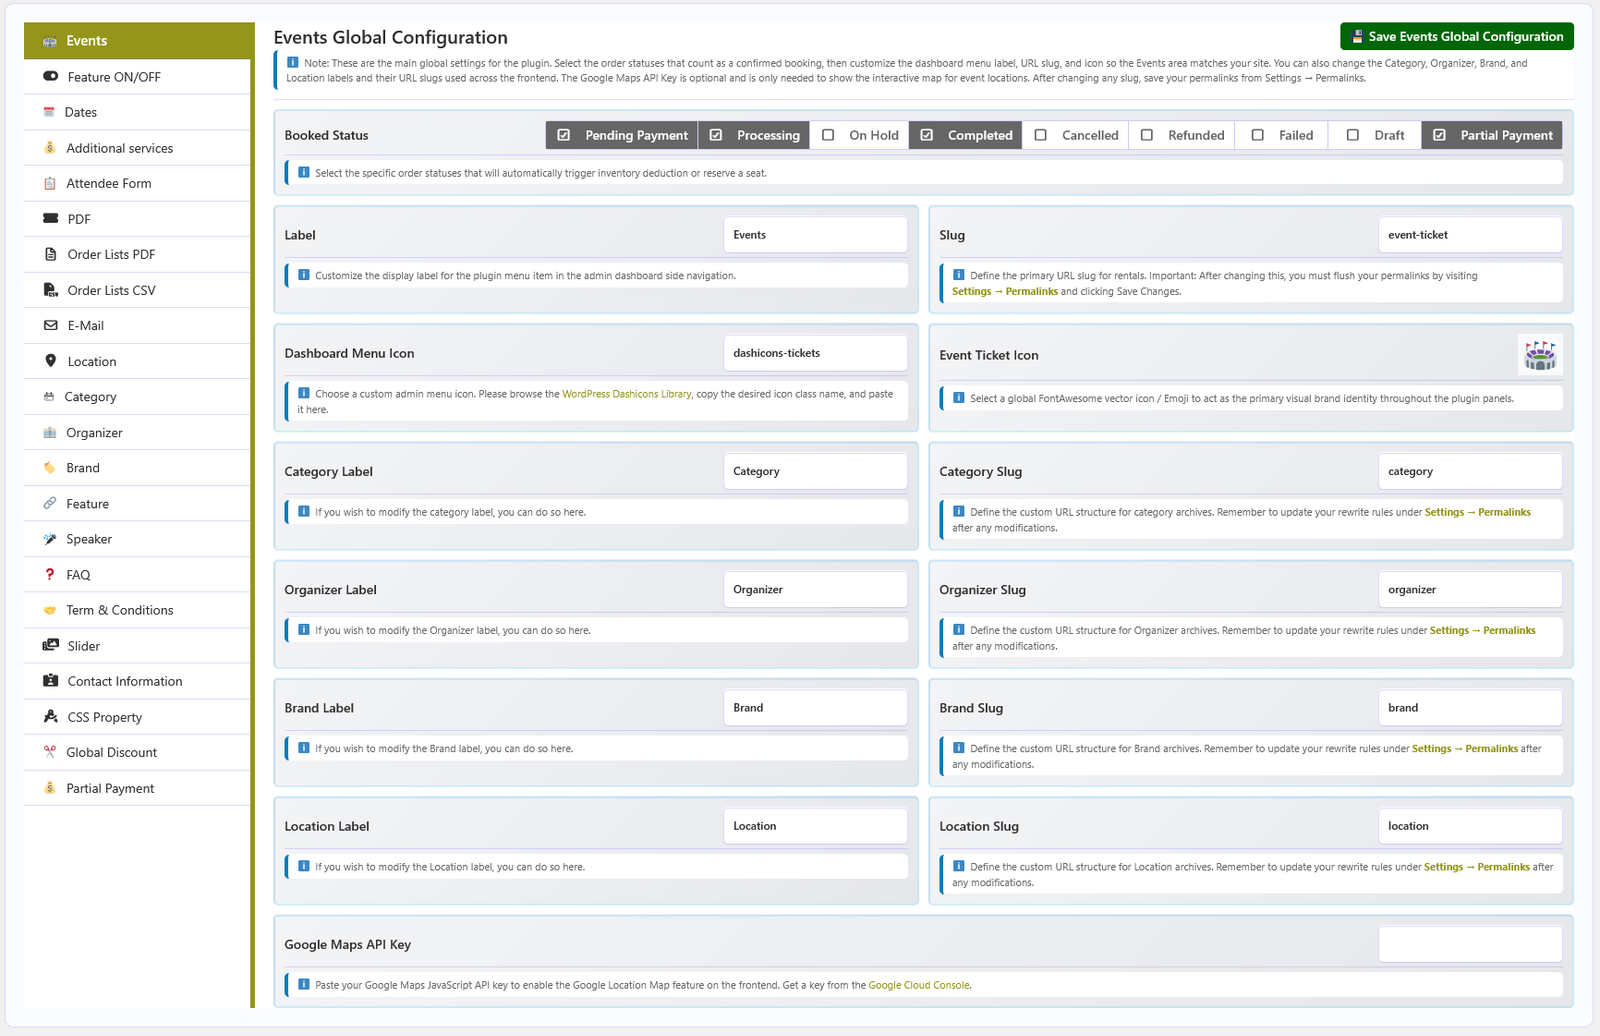
Global Configuration holds everything shared across events: naming and slugs, feature toggles, date and time formats, reusable libraries (ticket types, taxonomies, speakers, FAQ, terms), slider settings, contact details and CSS properties.
📚 Sections
| Section | Purpose |
|---|---|
| Events (first tab) | Booked Status, menu label, slug, dashboard menu icon, event ticket icon, taxonomy labels and slugs, and the Google Maps API key. The tab title follows the Label field, so it is Events by default. |
| Feature ON/OFF | Enable or disable individual plugin modules across the admin and frontend. |
| Dates | Date format, time format, sale-closing buffer in minutes and advance-booking days. |
| Additional services | Reusable extras offered during booking. |
| Attendee Form | Default attendee form fields that can be imported into events. |
| Location | Venues with address and Google Map data. |
| Category / Organizer / Brand / Feature | Reusable taxonomies and libraries assigned to events. |
| Speaker | Reusable speaker profiles with photo, designation, company, bio, website and social links. |
| FAQ / Term & Conditions | Reusable content that can be imported into events. |
| Slider | Slider theme, images per row, indicators and popup behaviour. |
| Contact Information | Company name, address, phone and email. |
| CSS Property | Theme colours, border radius, font sizes and button/section colours. |
| PDF / Order Lists PDF / Order Lists CSV / E-Mail (PRO) | Ticket PDF branding, booking-list PDF columns, CSV export columns and booking email content, statuses, recipients and PDF attachment. |
| Partial Payment / Global Discount (PRO) | Site-wide deposit rules and date-based seasonal or early-bird discount rules. Event-specific versions live on the event editor's Partial Payment and Discount tabs. |
💾 Saving
Each section has its own save button labelled Save {section name} Configuration - for example Save Events Configuration, Save Feature ON/OFF Configuration, Save Slider Configuration, Save Contact Information Configuration and Save CSS Property Configuration. The Dates tab uses Save Global Date Configuration, while the reusable libraries (Location, Category, Organizer, Brand, Feature, Speaker, FAQ, Term & Conditions) save through Add New, Edit, and Save Global buttons or the library's own AJAX save. Changes apply immediately.
wc-processing,wc-completed (the saved value on this site also
includes wc-pending).
🔀 Feature ON/OFF
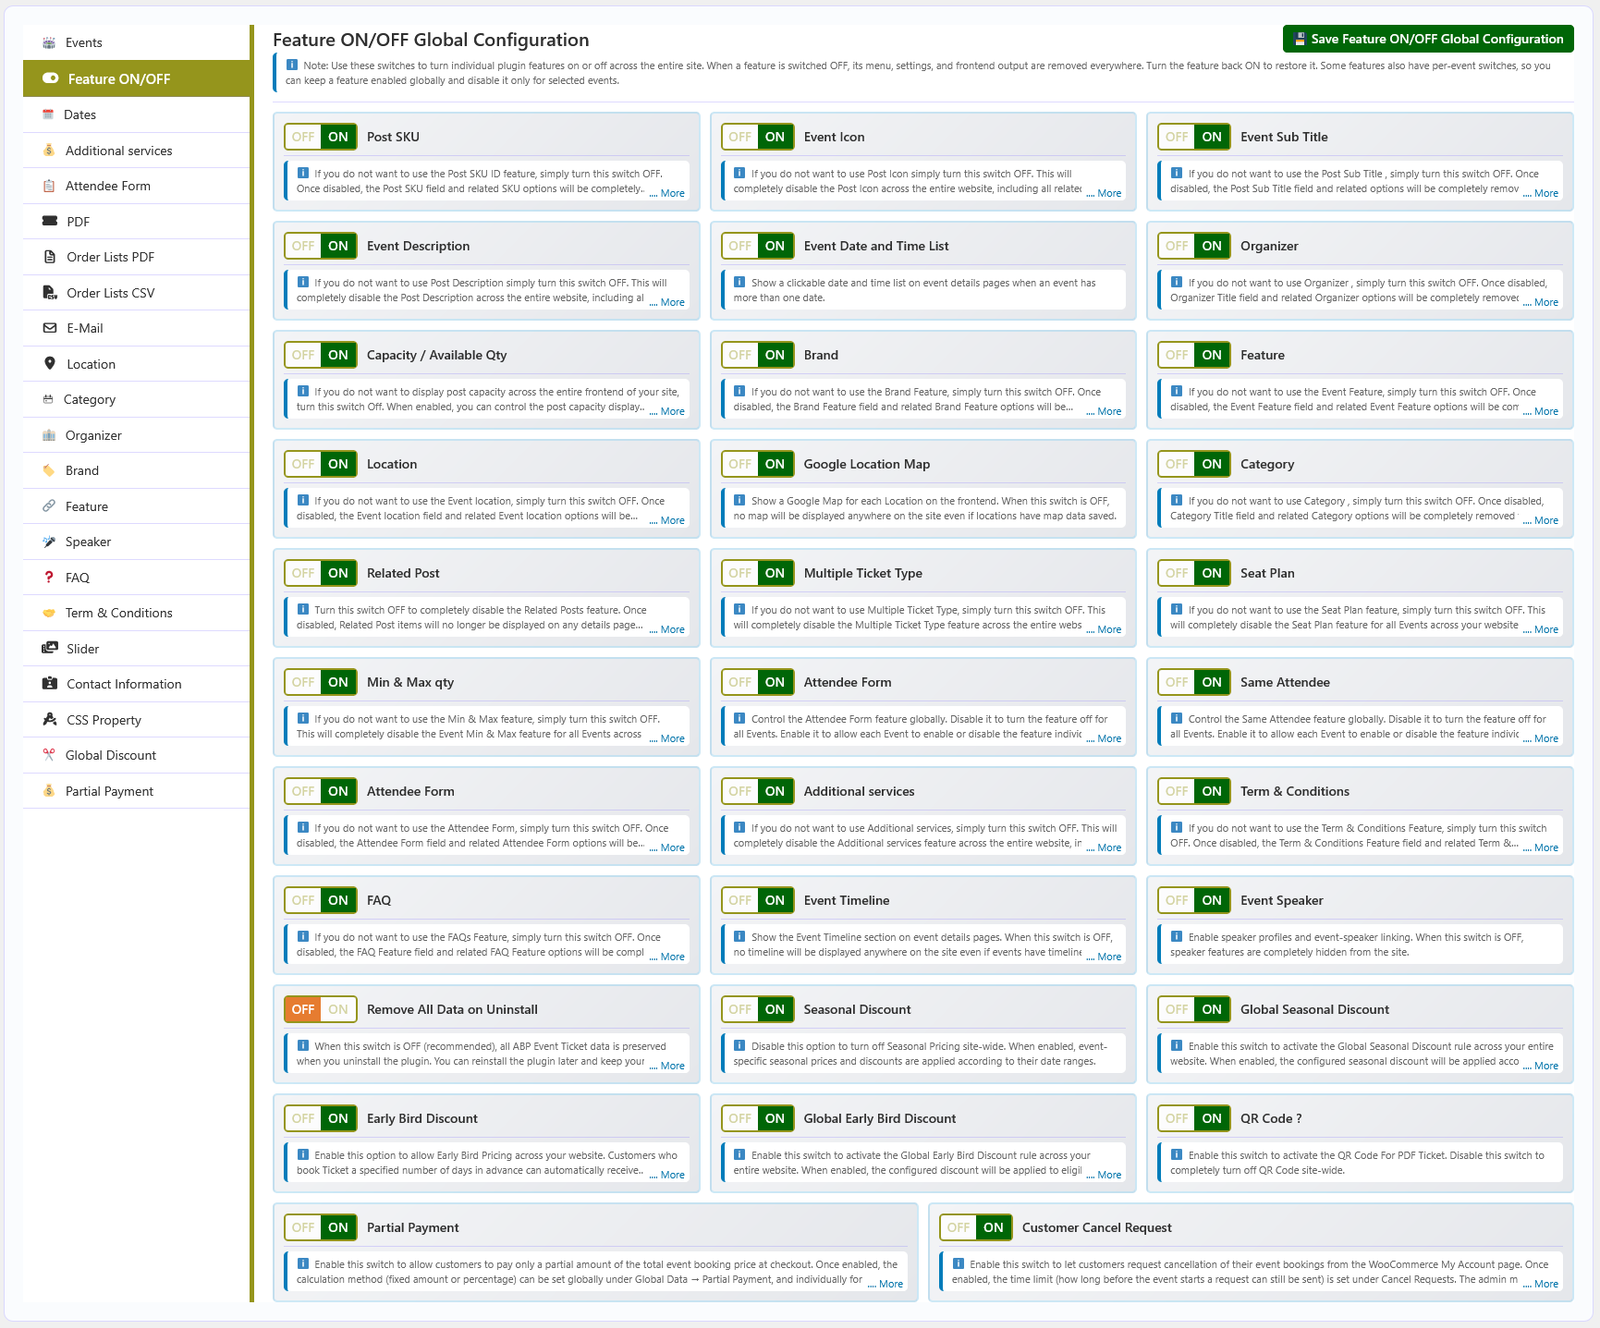
The Feature ON/OFF screen is the master control panel for the plugin. Every optional module can be switched on or off here; disabling a module removes its fields, tabs and configuration screens from the admin and hides its output on the frontend.
⚙️ How it works
Toggle a feature on to reveal its related fields, tabs and settings. Toggle it off to hide them everywhere. Some Global Configuration tabs and event editor sections only exist while their toggle is on. When ABP Event Ticket PRO is active, its additional toggles appear in the same list with a PRO badge.
🔁 Available toggles
| Group | Toggles |
|---|---|
| Event fields | Post SKU, Event Icon, Event Sub Title, Event Description, Event Date and Time List. |
| Taxonomies & relations | Organizer, Location, Category, Brand, Feature, Related Post. |
| Tickets & seating | Multiple Ticket Type, Seat Plan, Min & Max qty, Capacity / Available Qty. |
| Forms & extras | Attendee Form, Same Attendee, Attendee Form, Additional services. |
| Event content | Event Timeline, Event Speaker, FAQ, Term & Conditions. |
| Map | Google Location Map (also requires an API key on the first Global Configuration tab). |
| PRO features (with PRO active) | Seasonal Discount, Global Seasonal Discount, Early Bird Discount, Global Early Bird Discount, QR Code, Partial Payment, Customer Cancel Request. |
| System | Remove All Data on Uninstall. |
📅 Global Dates
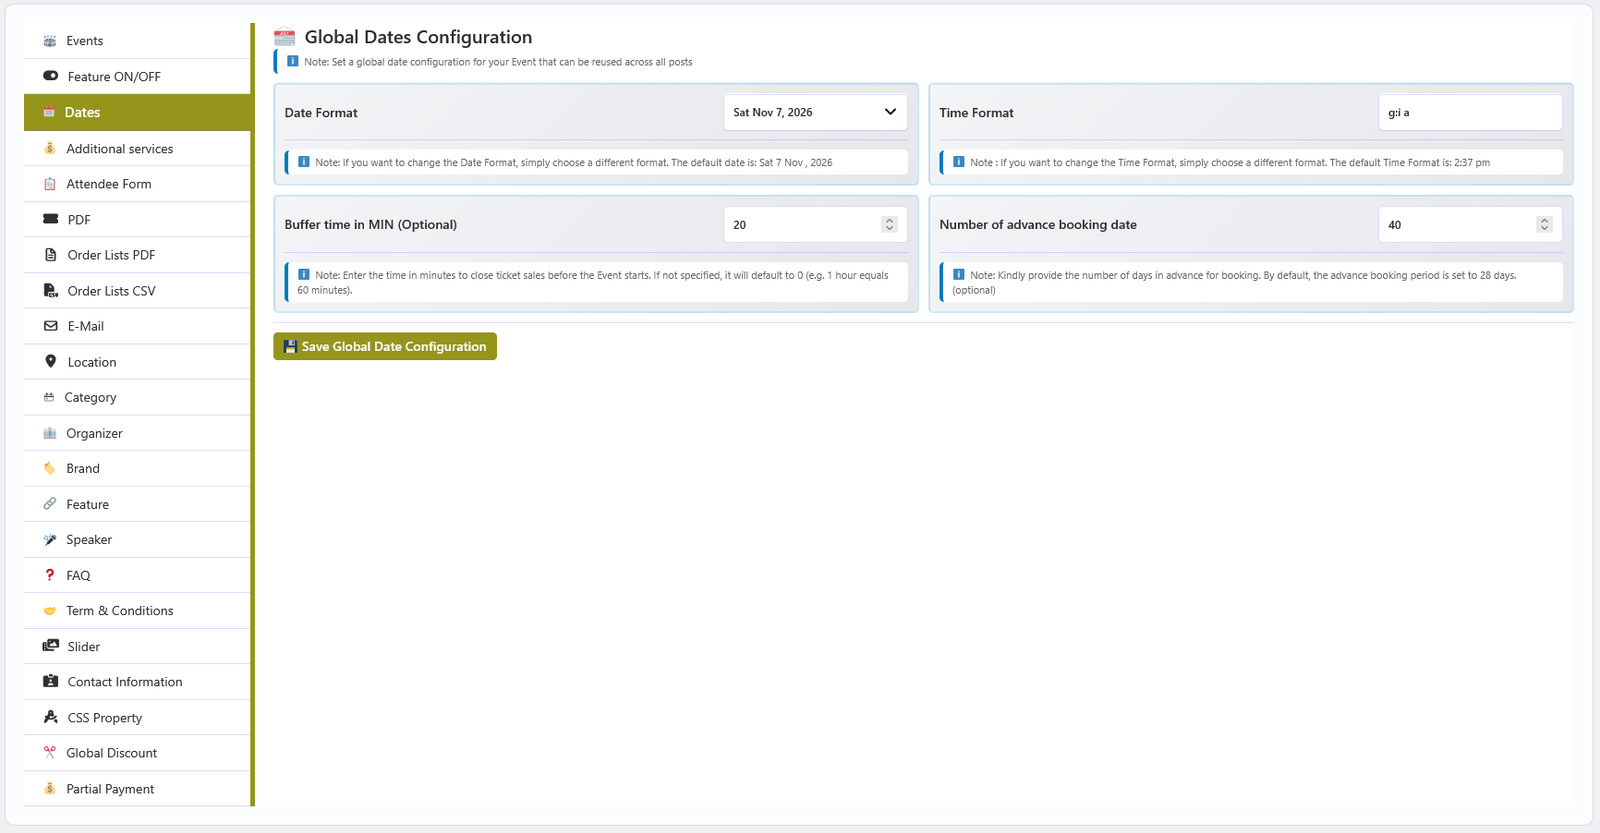
The Dates section under Global Configuration holds the date and time formats used throughout the plugin, plus the two values that control when booking opens and closes. These settings are global — they are not overridden per event.
📋 Available settings
| Setting | Description |
|---|---|
| Date Format | The display format for event dates across the admin and the frontend. |
| Time Format | The display format for session times, for example g:i a. |
| Buffer time in MIN | How many minutes before a session starts ticket sales close. Enter the value in minutes (60 = one hour). |
| Number of advance booking date | How many days ahead periodic dates are generated. The default is 28 days. |
🌍 Global Discounts PRO
Use site-wide date-range rules to apply Seasonal and Early Bird discounts across eligible events.
Setup steps
- In Global Configuration → Feature ON/OFF, enable Seasonal Discount or Early Bird Discount.
- Enable the corresponding global switch if that discount should apply site-wide.
- Open Global Configuration → Global Discount.
- Turn on the desired discount, add date ranges and percentages, and save the configuration.
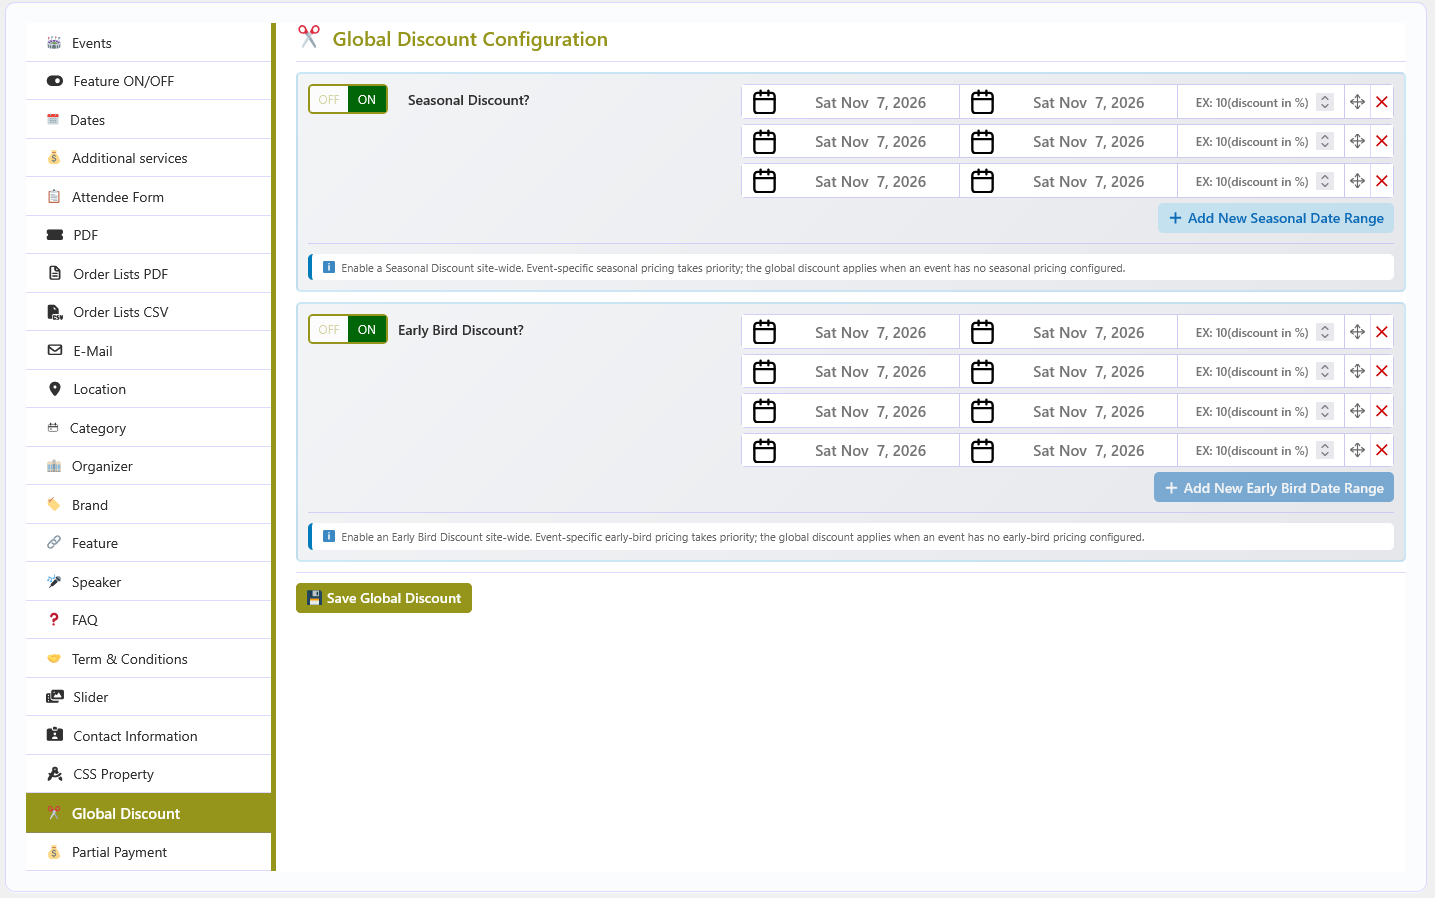
Configure each discount type separately. To use different rules for one event, configure its Discount tab instead. Review the event's scheduled dates and sale settings so customers see the intended price for each booking period.
💳 Global Partial Payment PRO
Set the default deposit rule used by event bookings that offer partial payment.
Set the default
- Enable Partial Payment under Global Configuration → Feature ON/OFF.
- Open Global Configuration → Partial Payment.
- Choose Percentage or Fixed Amount, enter the value, and save.
- For each event that should accept deposits, edit the event and enable partial payment on its Partial Payment tab.
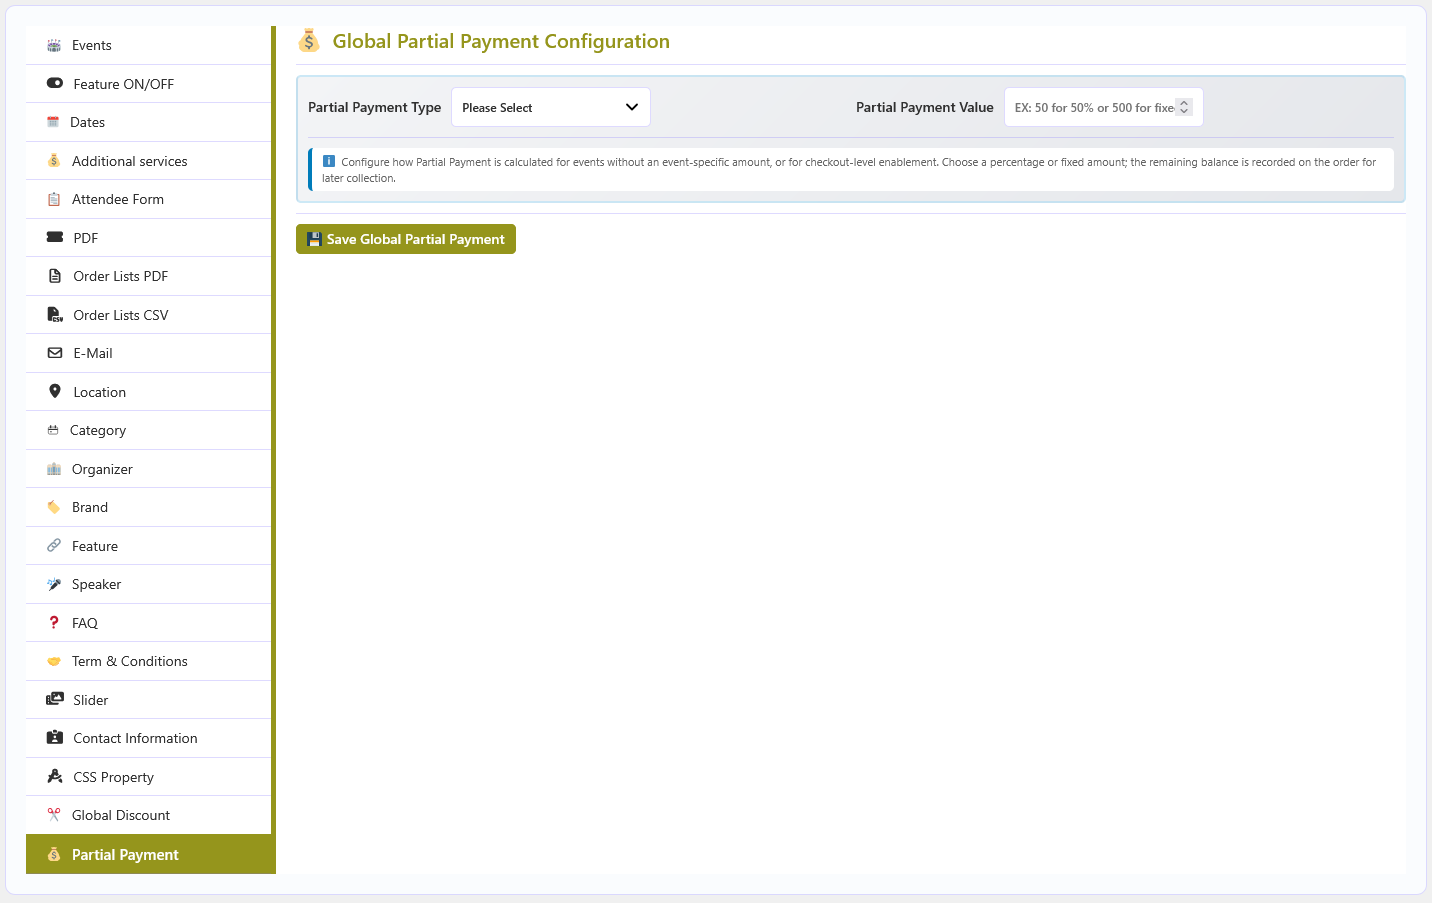
The global value provides the default payment rule; event-level settings control whether a specific event offers partial payment and can specify its own value. The customer's unpaid balance is shown in their WooCommerce account and the booking/order details.
🎫 Ticket PDF Settings PRO
Brand individual booking PDFs and control which staff roles can download them.
Configure ticket documents
- Open Global Configuration → PDF.
- Optionally choose a background image and logo, then set the logo height, background color, and text color.
- Set the user roles permitted to download ticket PDFs.
- Optionally set the Terms & Conditions heading and content for the PDF.
- Save the configuration and test a booking PDF.
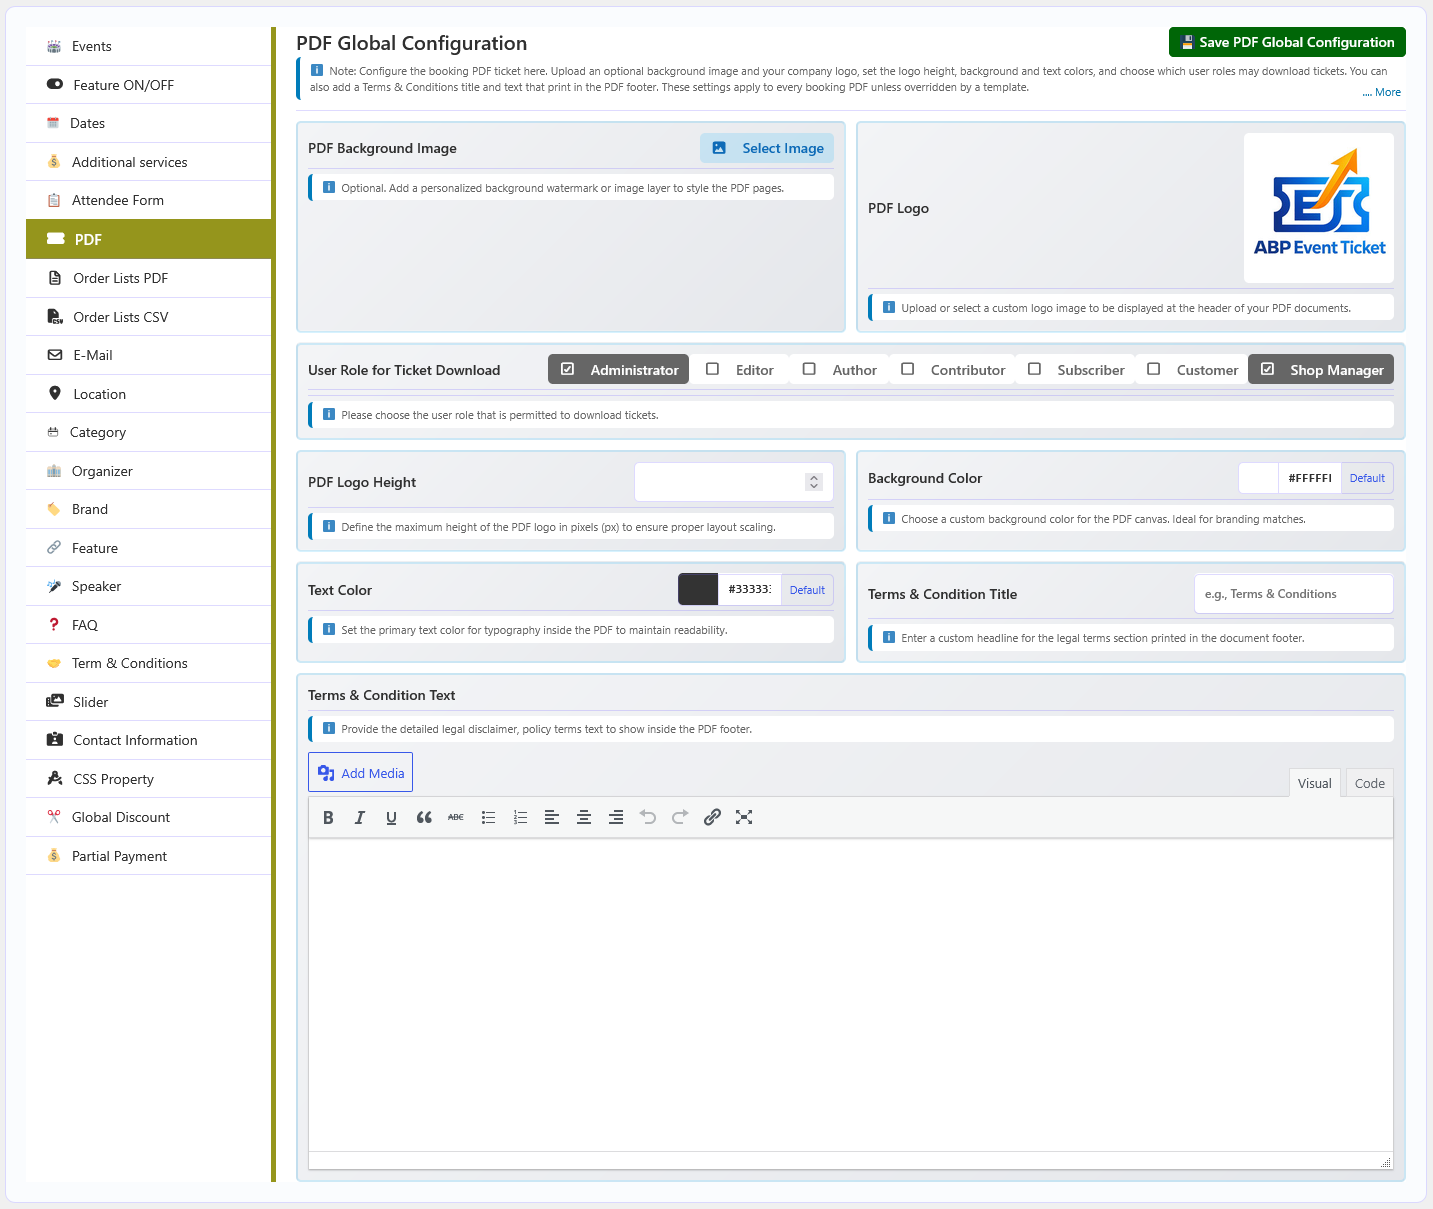
PDF download actions appear with eligible bookings when the required PDF tools are available. The PRO plugin also supports PDF attachments on booking emails when that option is enabled.
📄 Attendee List PDF PRO
Choose the company details and booking columns printed on an attendee-list PDF.
Configure and export
- Open Global Configuration → Order Lists PDF.
- Enable or disable the company address, company logo, and booking summary.
- Choose which fields to include, such as event/date/session, ticket information, customer/attendee details, order status, payment method, and price.
- Save the settings. Open Orders, apply the desired filters, and use the PDF export action to create the attendee list for that result set.
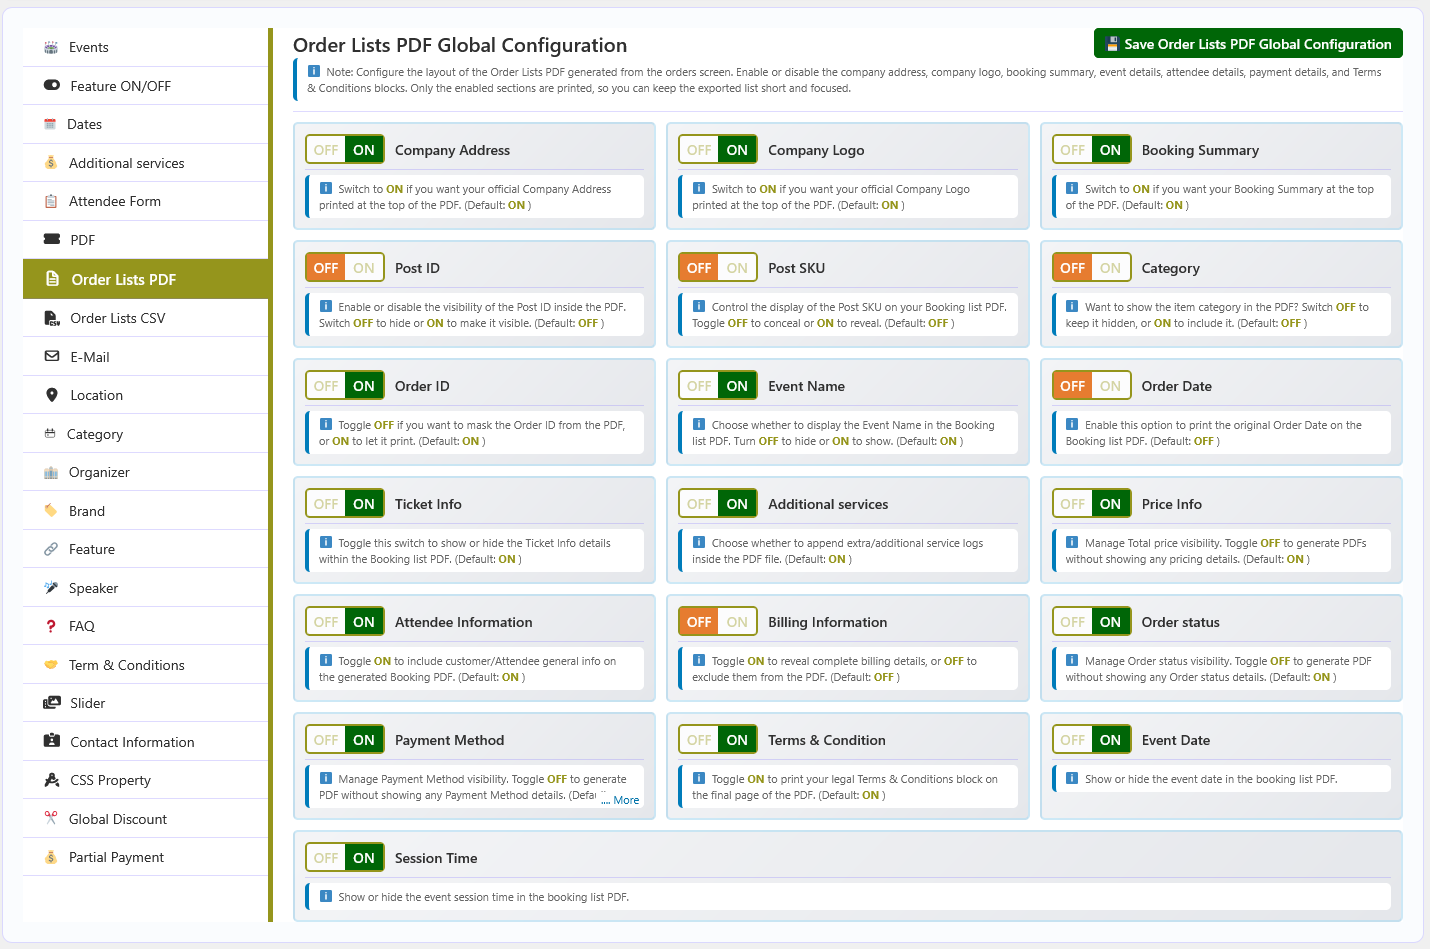
Review the selected columns before sharing or printing a list because it may contain customer personal or billing information.
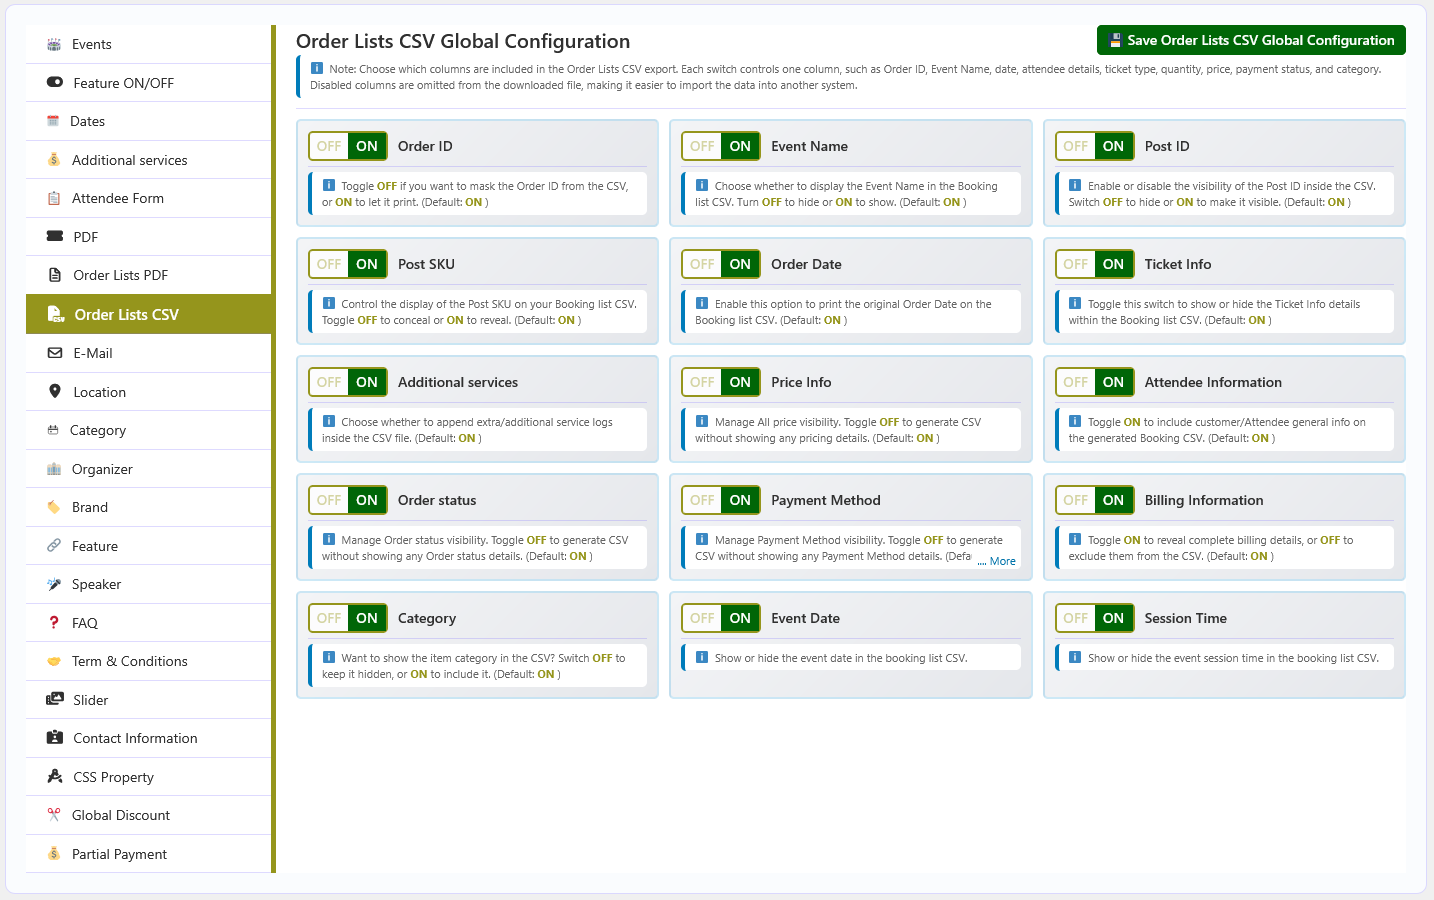
📊 Booking CSV Export PRO
Select the booking and attendee fields included in CSV exports, then export filtered booking results from Orders.
Configure CSV fields
- Open Global Configuration → Order Lists CSV.
- Choose which columns to include, such as order ID/status/date, event and session, ticket, price, attendee/additional-service, billing, and payment details.
- Save the configuration.
- Go to Orders, apply filters for the bookings you need, and choose the CSV export action.
✉️ Booking Email PRO
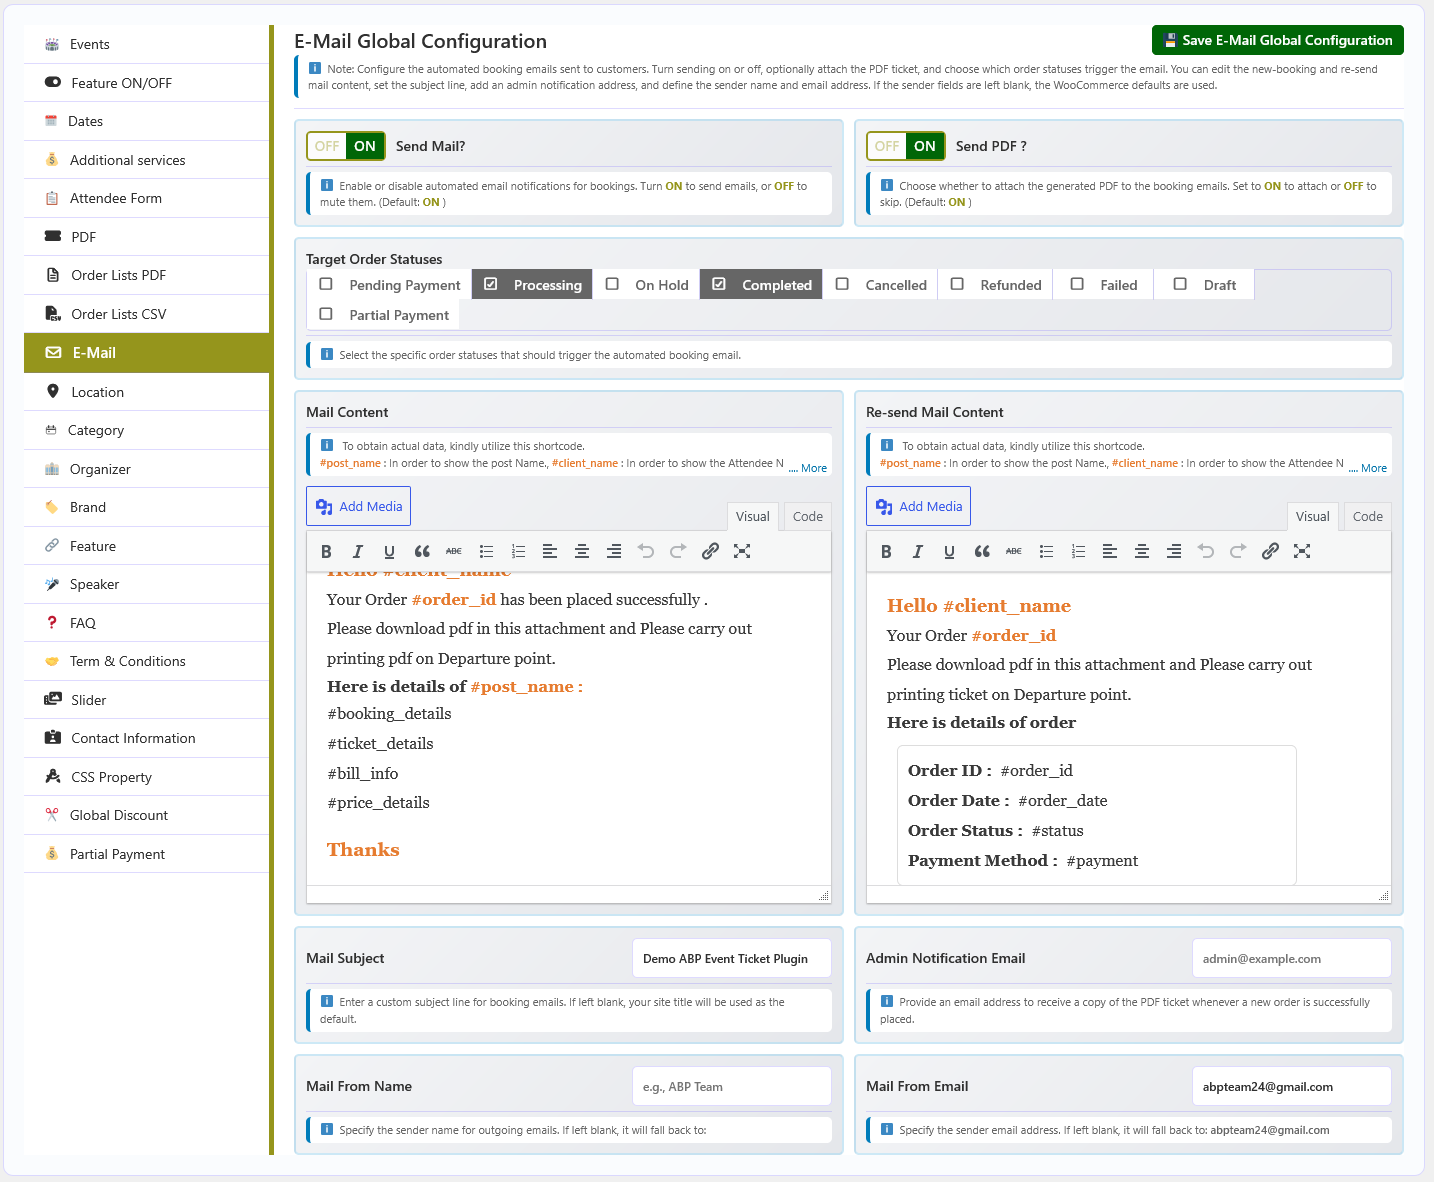
Customize booking notifications and optionally attach a PDF ticket.
Set up the email
- Open Global Configuration → E-Mail and enable booking email.
- Select WooCommerce order statuses that should trigger the email.
- Set the sender name/address, subject, optional administrator notification address, and email body.
- Choose whether to attach the booking PDF. PDF attachments require ABP PDF Tools to be active.
- Save, then test with a booking in one of the selected order statuses.
Available content placeholders
Insert these placeholders in the email body; the plugin replaces them with booking data:
#post_name,#client_name,#order_id,#order_date#status,#payment,#booking_details#ticket_details,#bill_info,#price_details
Administrators can resend a booking email from its booking/order action. Check the recipient, message, selected order status, and PDF dependency if a notification is not received.
➕ Global Additional Services
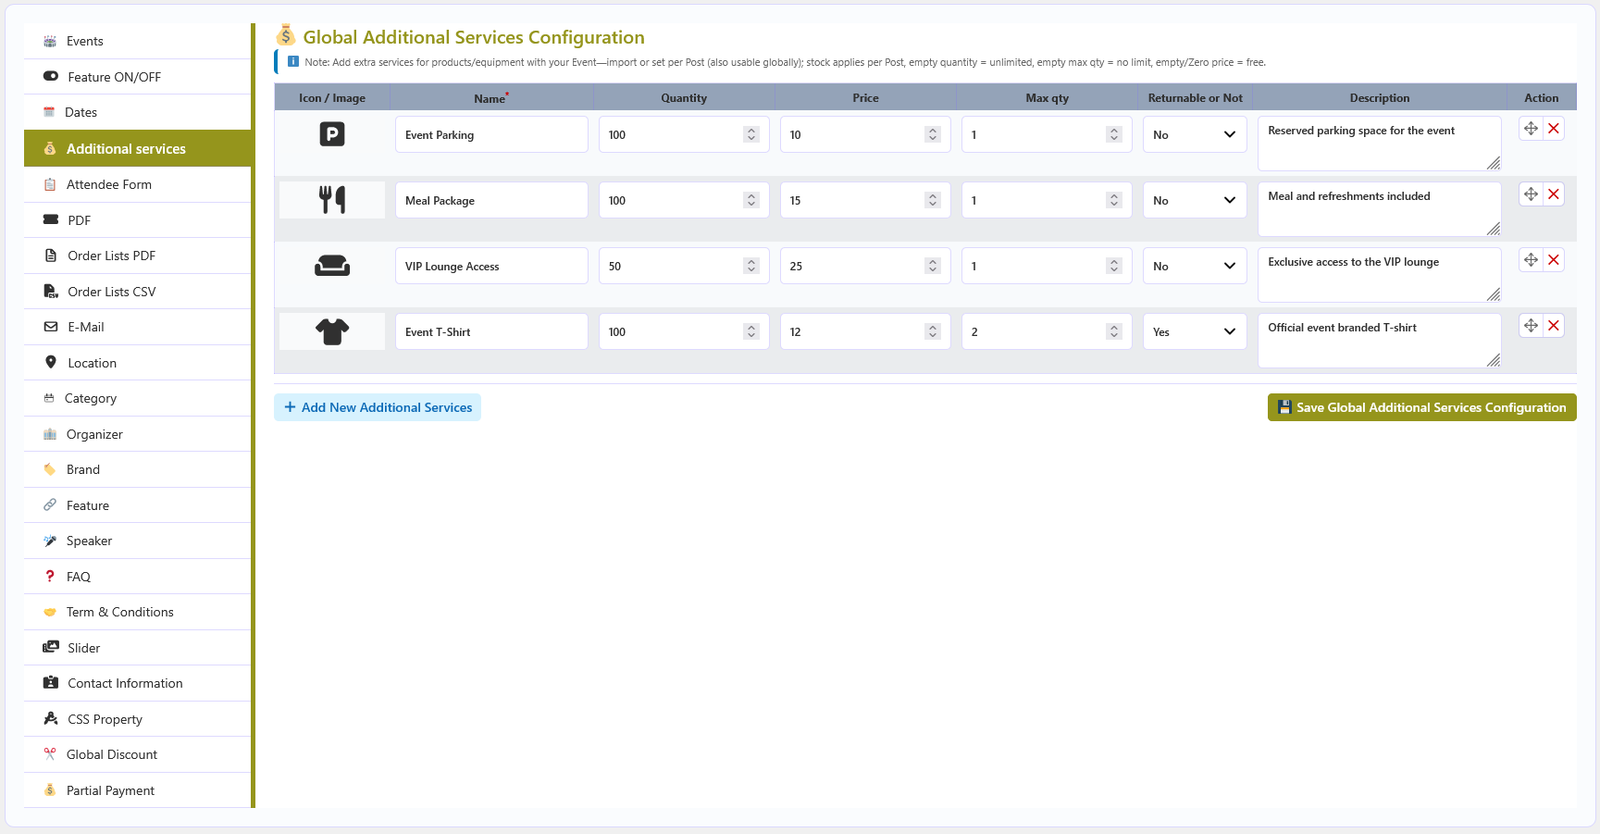
The Additional services section under Global Configuration is the reusable library of extras customers can add to a booking — for example parking, a meal, a programme or merchandise. Services created here can be imported into any event.
📋 Service fields
| Column | Description |
|---|---|
| Icon / Image | Optional icon or image shown with the service. |
| Name | The service name customers see. This field is required. |
| Quantity | Total quantity of the service available. |
| Price | Price per unit, added to the booking total. |
| Max qty | Maximum quantity a customer may add in one booking. |
| Returnable or Not | Yes or No — marks whether the item can be returned. |
| Description | Optional text shown with the service. |
| Action | Drag the row to reorder it, or delete the service. |
💾 Saving the library
Use Add New Additional services to add a row, then click Save Global Additional services Configuration. The saved list becomes available through the Import Additional Service button on every event.
🧾 Global Attendee Form
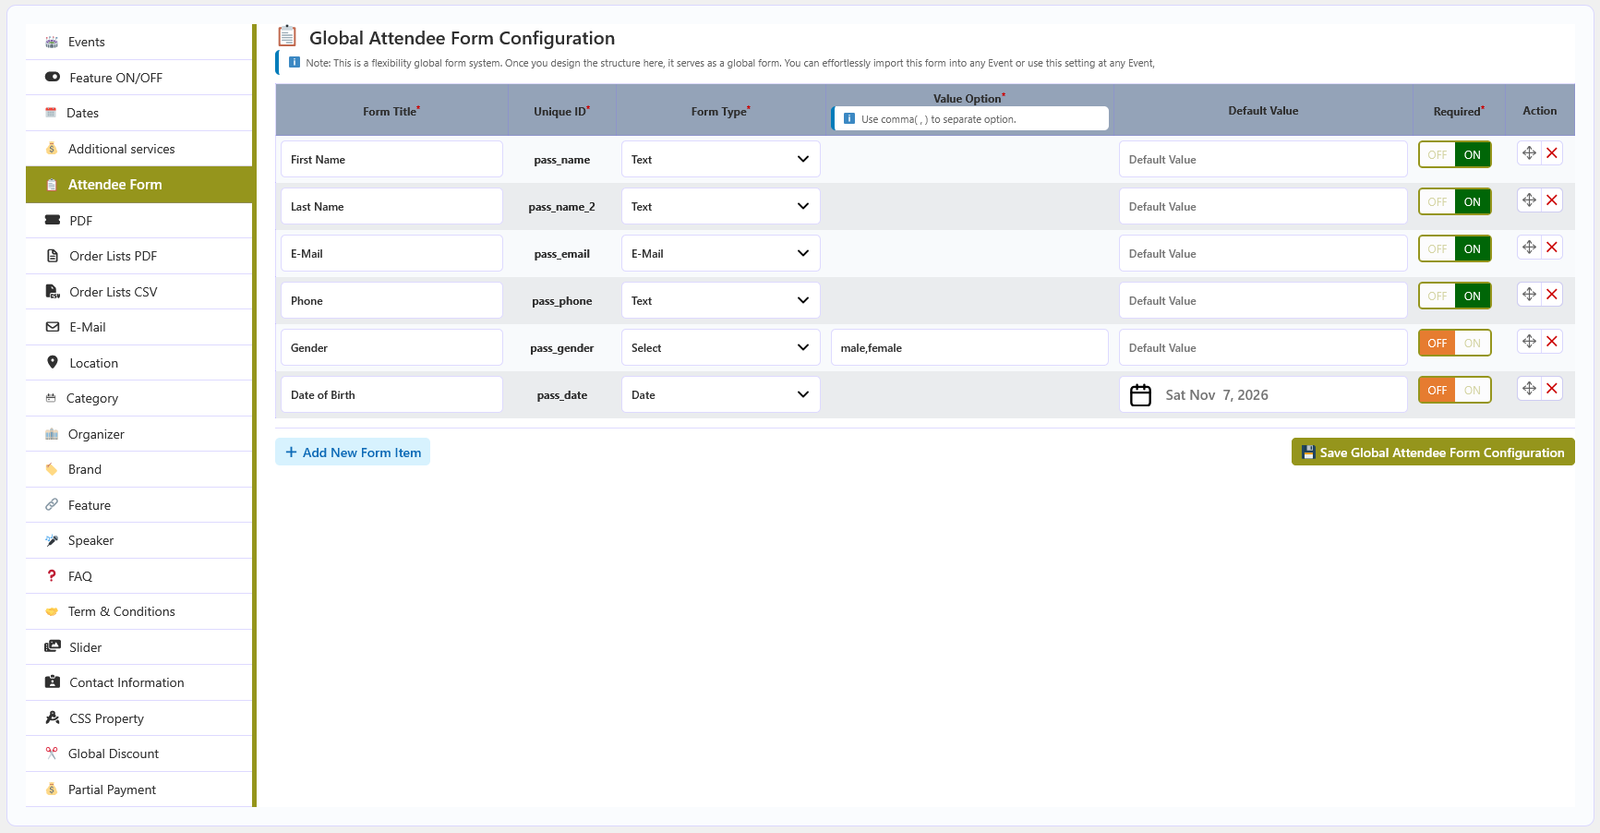
The Attendee Form section under Global Configuration is the reusable attendee form. Build the fields once here, then import them into any event that should collect the same information.
📋 Form fields
| Column | Description |
|---|---|
| Form Title | The label customers see. Required. |
| Unique ID | The field key stored with the booking. Required and must be unique. |
| Form Type | The input type. Required. Available types are Text, E-Mail, Number, Select, Checkbox, Radio, Textarea and Date. |
| Value Option | Required for Select, Checkbox and Radio — the list of choices. |
| Default Value | Optional pre-filled value. For the Date type this is a date picker value. |
| Required | Whether the customer must complete the field before booking. |
| Action | Drag to reorder fields, or delete a field. |
💾 Saving the library
Click Add New Form Item to add a field, then click Save Global Attendee Form Configuration. Events can copy these fields with the Import Global Attendee Form button on their own Attendee Form tab.
📍 Locations
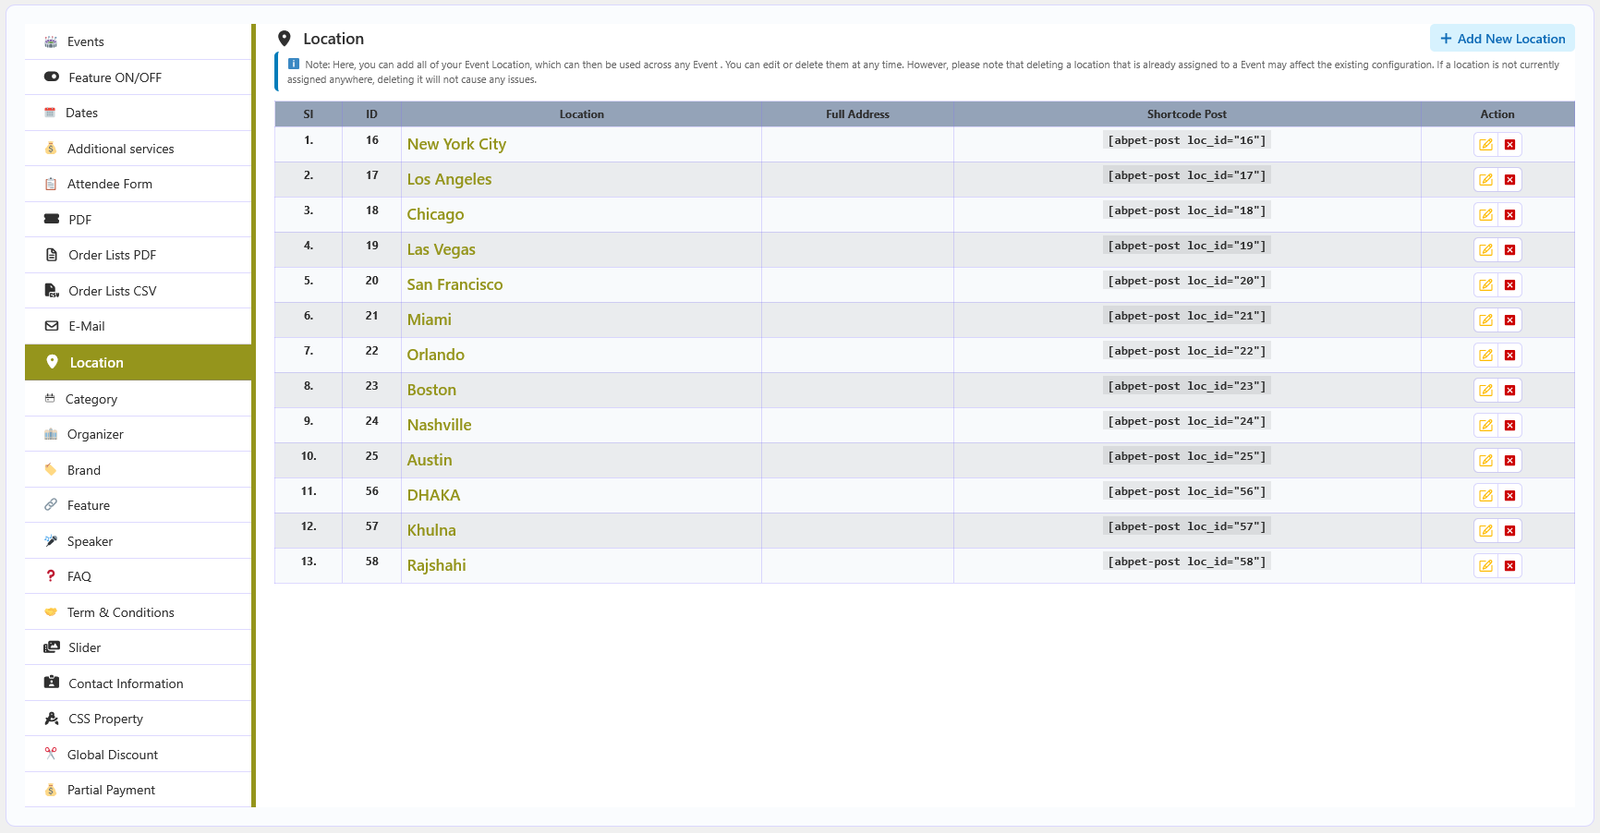
The Location section manages the venues you assign to events. Each entry stores a name, an optional slug, a full address, and optional Google Map coordinates used to render a map on the event page.
📋 The location list
The table shows one row per location with these columns:
| Column | Description |
|---|---|
| SI | Running row number. |
| ID | The term ID of the location, used in shortcodes and assignments. |
| Location label | The location name, linked to its frontend archive page. |
| Full Address | The saved address text for the location. |
| Shortcode Post | A ready-made shortcode such as [abpet-post loc_id="12"] for showing posts of this location. |
| Action | Pencil icon to edit, close icon to trash the location. |
➕ Adding or editing a location
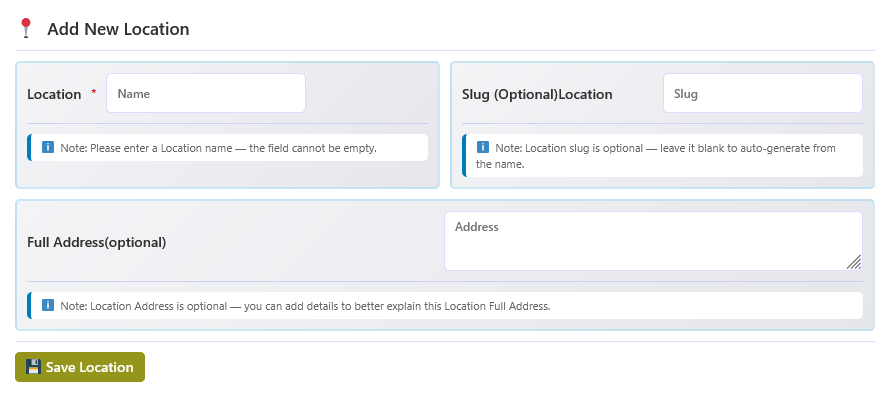
- Click Add New Location - A popup form opens. The same form is used for editing.
- Enter the location name - Required; the field cannot be left empty.
- Set a slug (optional) - Leave it blank to auto-generate the slug from the name.
- Add the full address (optional) - Free text describing the venue address.
- Search the map (optional) - When the Google Map field is available, search for the address or place and select it. Latitude, longitude, place, and address are then saved with the location.
- Click Save Location - The button reads Update Location when editing an existing entry.
🗺️ Google Location Map
The map search appears only when Google Location Map is enabled under Feature ON/OFF and a Google Maps API key is saved under Global Configuration → Events (the first tab, named after the Label value). On the frontend, the map is drawn with the Google Maps JavaScript API when a key exists, and falls back to an embedded iframe map when it does not. The map markup follows the event's details template (Default, Light, or Modern).
🗂️ Categories
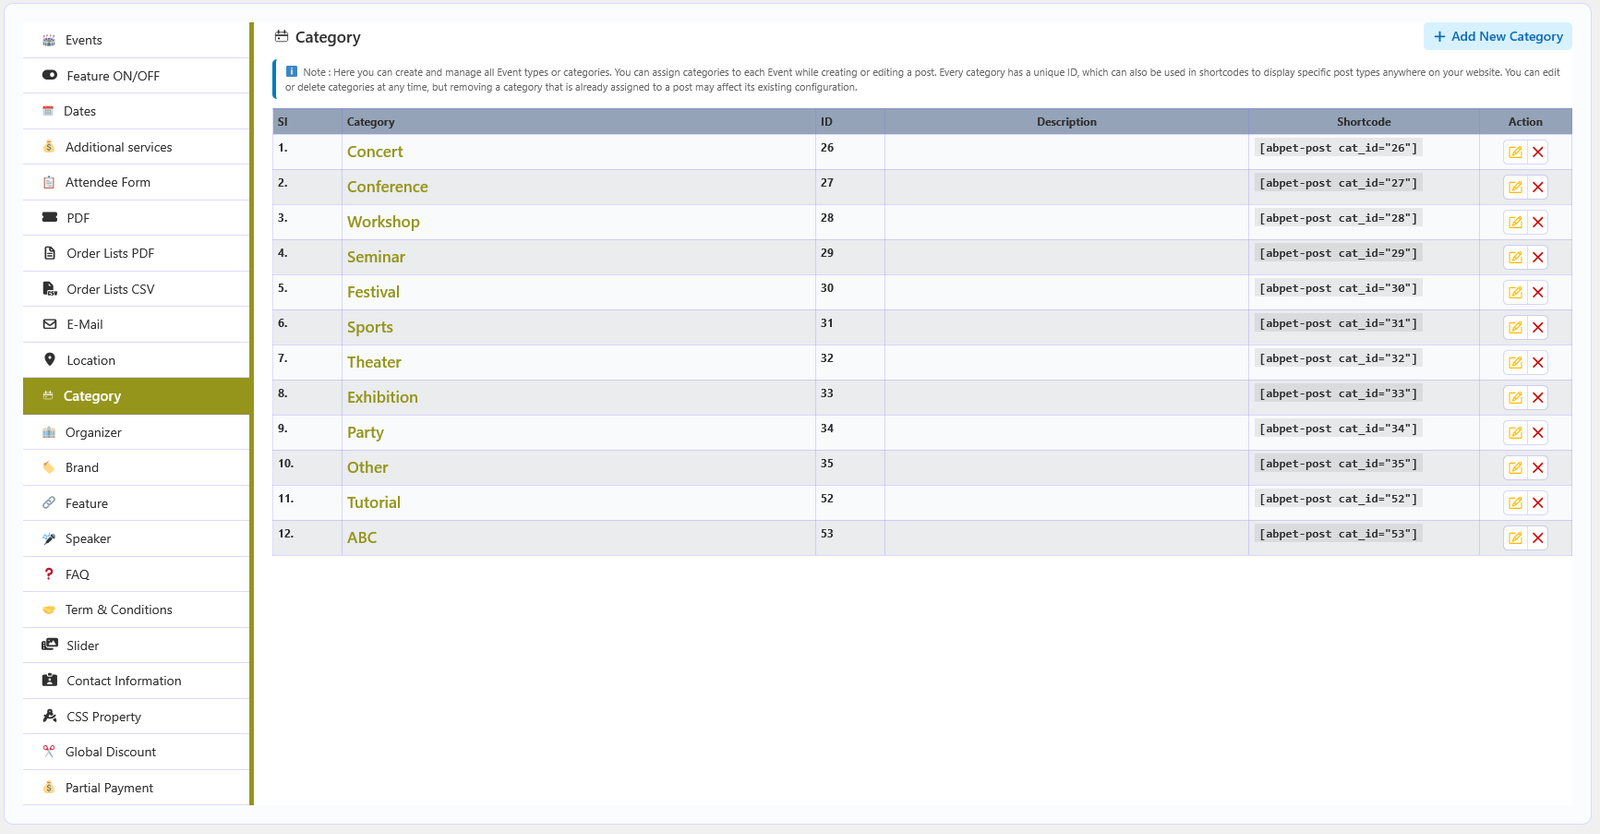
The Category section creates and manages the event categories. Categories group events, can be assigned while creating an event, and each one has an ID that works in shortcodes.
📋 The category list
| Column | Description |
|---|---|
| SI | Running row number. |
| Category label | The category name, linked to its frontend archive page. |
| ID | The term ID used for assignments and shortcodes. |
| Description | The description text entered for the category. |
| Shortcode | A ready-made shortcode such as [abpet-post cat_id="7"]. |
| Action | Pencil icon to edit, close icon to trash the category. |
➕ Adding or editing a category
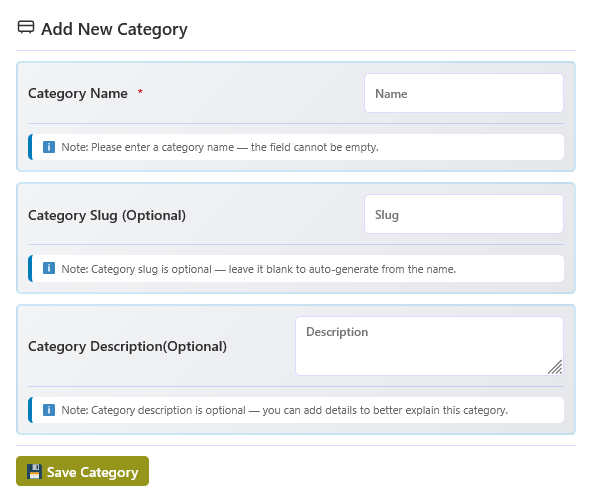
- Click Add New Category - A popup form opens, shared by create and edit.
- Enter the category name - Required.
- Set a slug (optional) - Leave it blank to auto-generate one from the name.
- Add a description (optional) - Describes what the category contains.
- Save - The category is stored and can be assigned to events.
🏢 Organizers
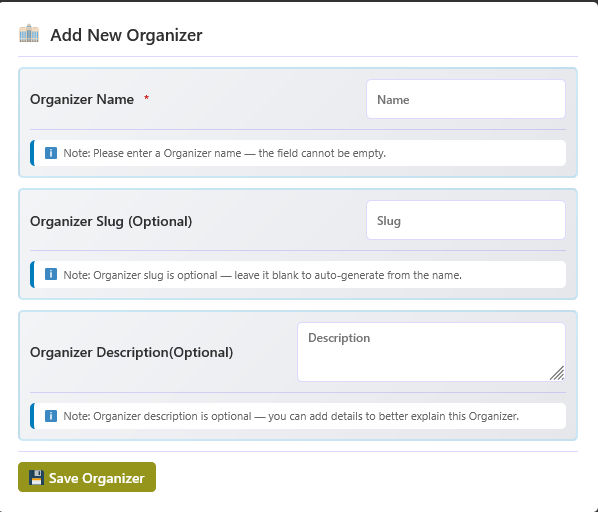
The Organizers section manages the companies or people behind your events. An organizer can be assigned to any event and displayed on the event details page.
📋 Fields
| Field | Description |
|---|---|
| Name | The organizer name. Required. |
| Slug (Optional) | URL slug for the organizer archive. Leave empty to let WordPress generate it from the name. |
| Description (Optional) | A short description of the organizer. |

🛠️ Managing organizers
- Add New — open the popup and fill in the fields above.
- Edit — reopen the popup for an existing organizer.
- Trash — remove the organizer from the library.
- Organizers can be dragged to change their order in the list.
🏷️ Brands
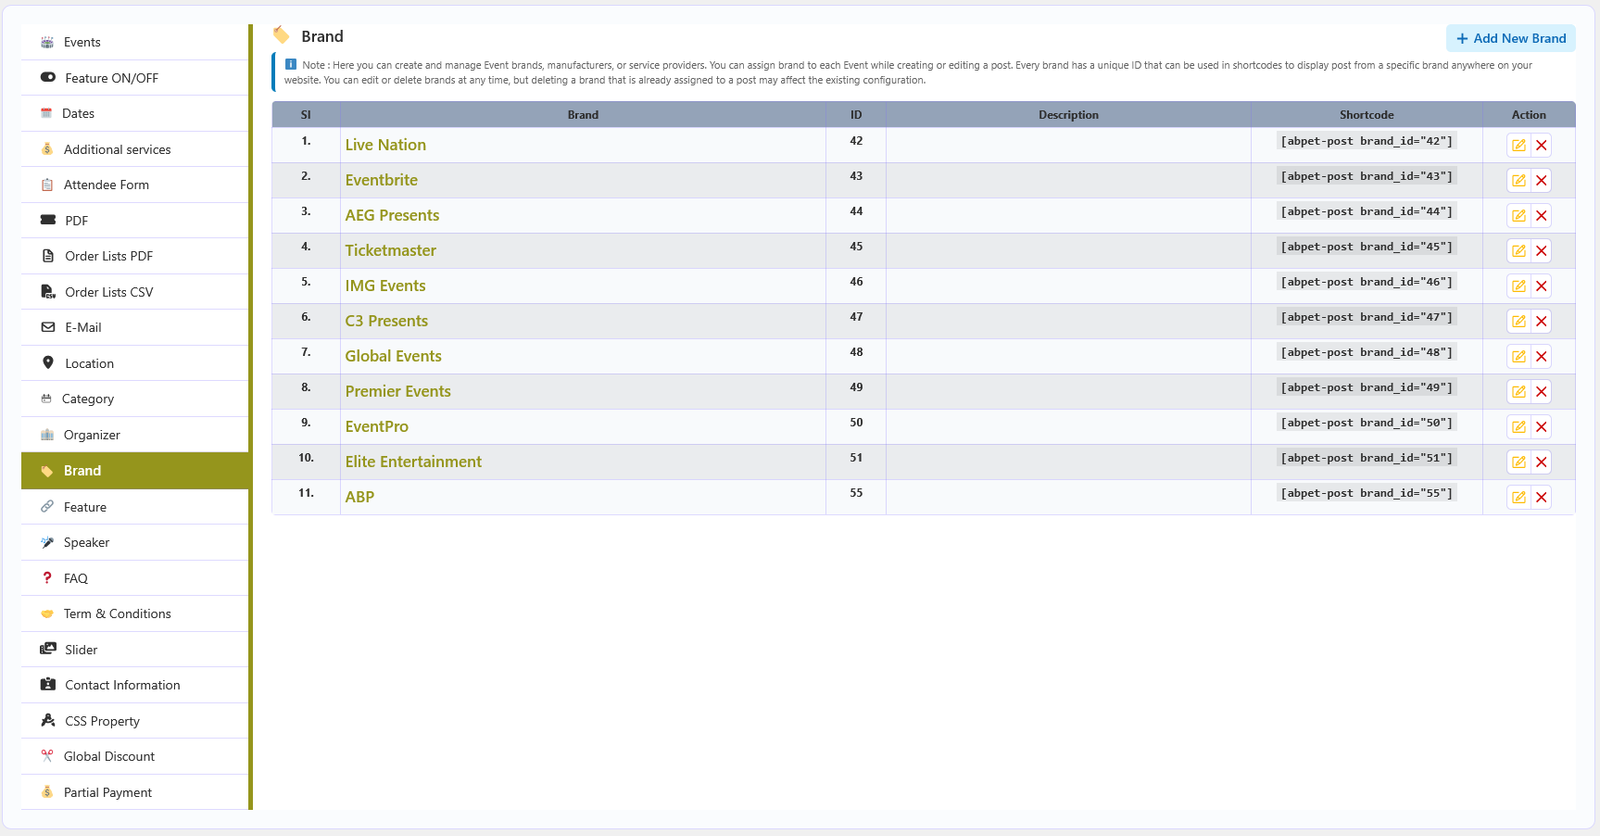
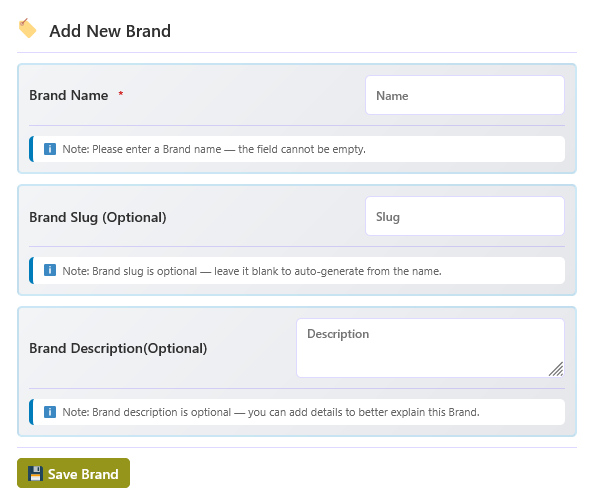
The Brands section manages the brands associated with your events. A brand can be assigned to any event and shown on the event details page.
📋 Fields
| Field | Description |
|---|---|
| Name | The brand name. Required. |
| Slug (Optional) | URL slug for the brand archive. Leave empty to let WordPress generate it from the name. |
| Description (Optional) | A short description of the brand. |
🛠️ Managing brands
- Add New — open the popup and fill in the fields above.
- Edit — reopen the popup for an existing brand.
- Trash — remove the brand from the library.
- Brands can be dragged to change their order in the list.
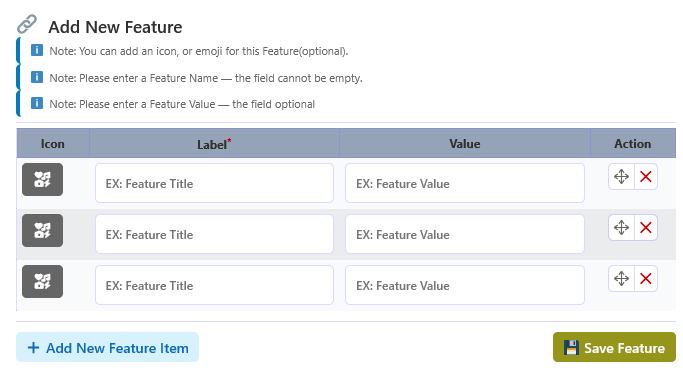
✨ Features Library
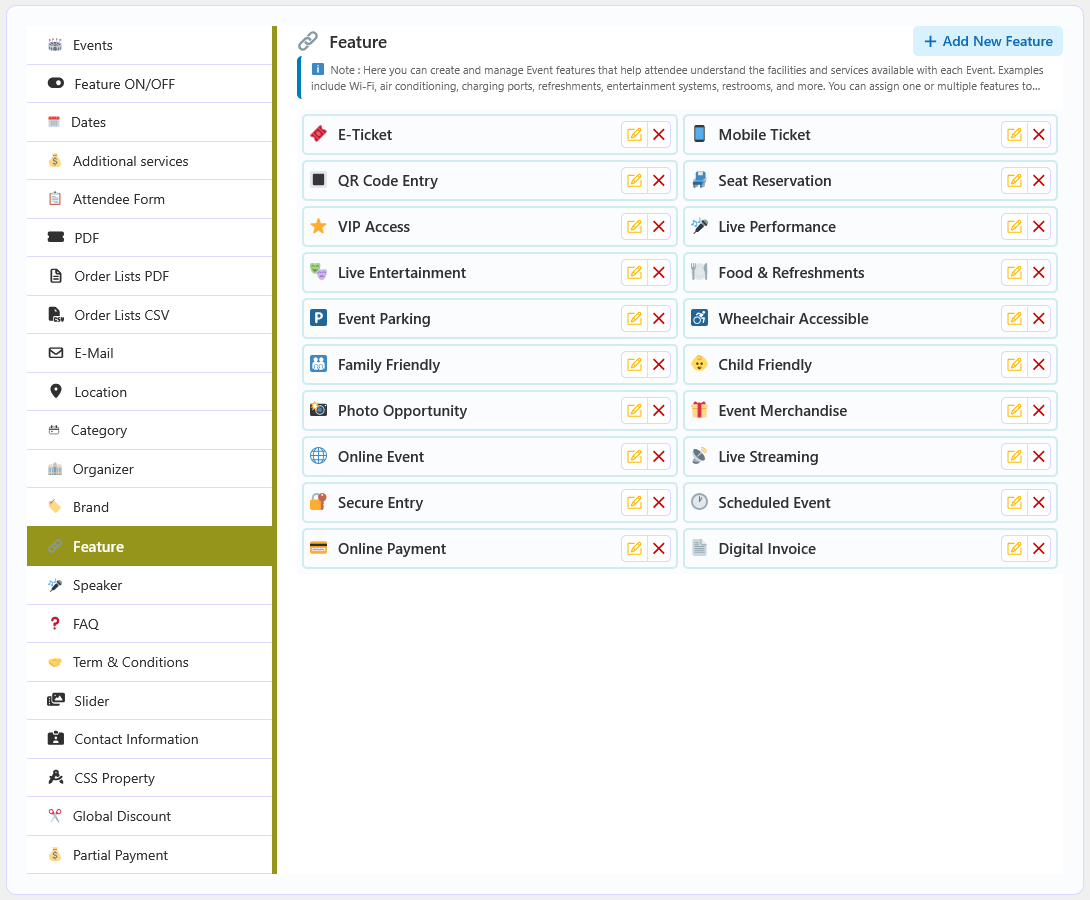
The Features library holds reusable event highlights — such as “Free Wi-Fi”, “Parking Included” or “Live Streaming”. Features are assigned to events and displayed on the event page.
📋 Fields
| Column | Description |
|---|---|
| Icon | Optional icon shown next to the feature. |
| Label | The feature title. Required. |
| Value | Optional supporting text shown with the label, for example “Yes” or “Included”. |
| Action | Drag to reorder, or delete the row. |
💾 Saving the library
Click Add New Feature Item to add a row, then save the list with the button below the table. Saved features become available when assigning features to an event.
🎤 Speakers
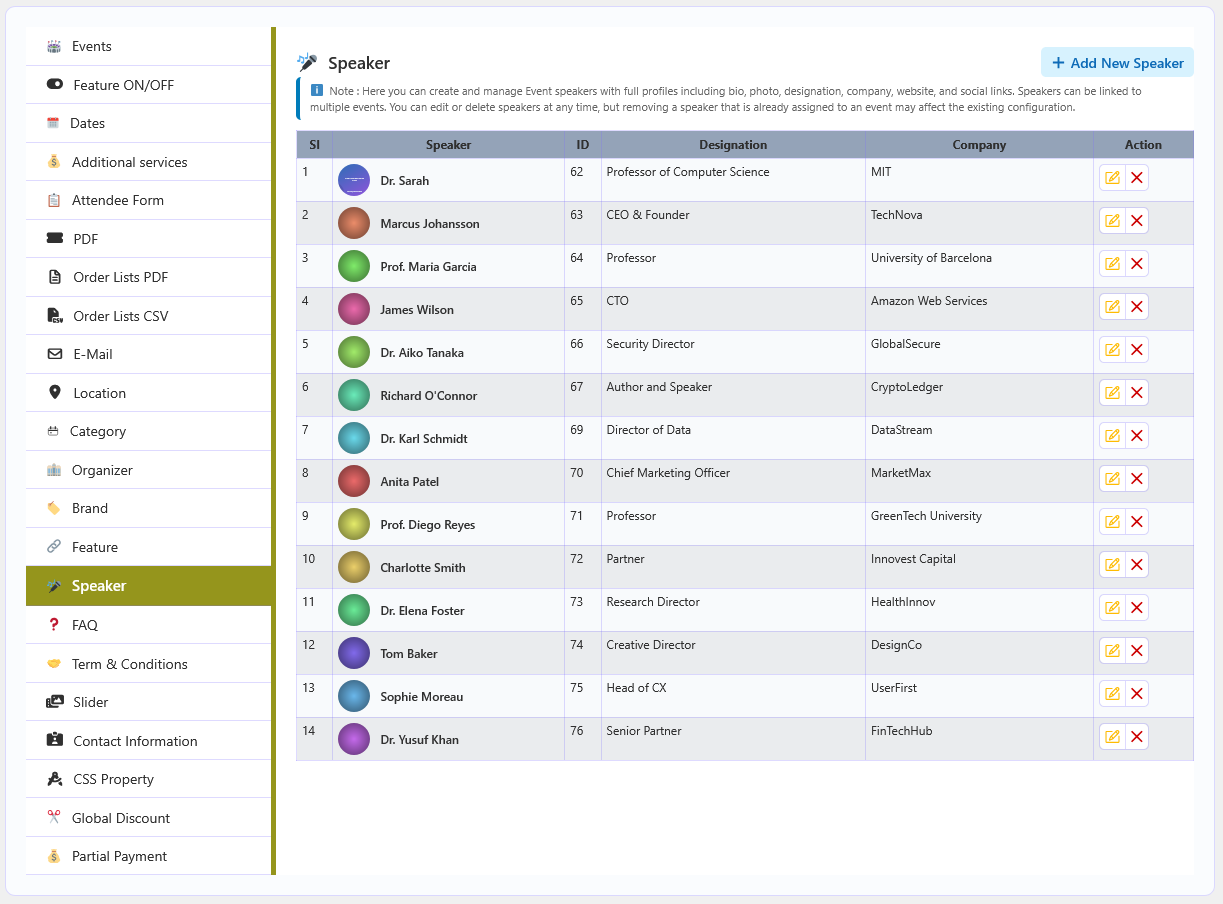
The Speaker section under Global Configuration is the central library of speaker profiles. Create a profile once and link it to any number of events.
📋 The speaker list
| Column | Description |
|---|---|
| SI | Running row number. |
| Speaker | Photo thumbnail (when uploaded) and the speaker's name. |
| ID | The speaker ID, used for event linking and shortcode filters. |
| Designation | The job title or role saved in the profile. |
| Company | The company or organization saved in the profile. |
| Action | Pencil icon to edit, close icon to trash the speaker. |
➕ Adding a speaker
- Click Add New Speaker - A popup form opens; the same form is used for editing.
- Speaker Name - Required. Shown on the event details page and the speaker profile page.
- Speaker Slug (optional) - Leave it blank to auto-generate from the name.
- Bio - A rich-text biography or description.
- Photo - Upload a profile image from the media library.
- Designation and Company - For example CEO, CTO, or Professor, plus the organization name.
- Website - A URL that must start with
http://orhttps://. - Social Links - Twitter/X, LinkedIn, Facebook, and Instagram profile URLs.
- Save - The button reads Update Speaker when editing, and the profile is ready to assign.
❓ Global FAQ
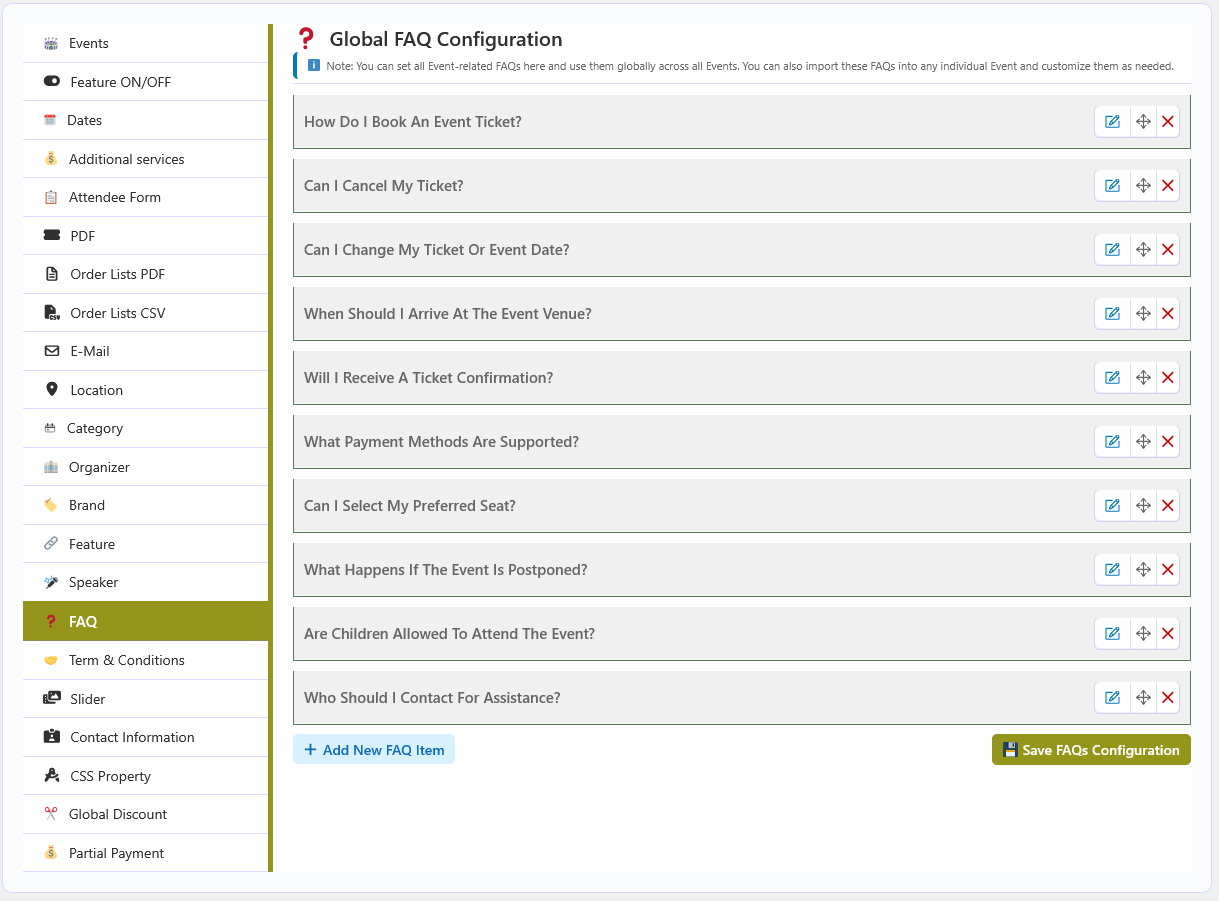
The FAQ section under Global Configuration stores one shared FAQ library for every event. Its items can be used globally by events or imported into a single event and edited there.
🧩 What this section contains
- Add New FAQ Item - Creates a new FAQ row.
- FAQ Title - Required text field. It is also the heading of the collapsed row.
- Description - Required rich-text editor (media and quicktags enabled).
- Row actions - Edit (pencil), delete (trash), and drag-to-sort inside the list.
- Save FAQs Configuration - Saves the entire library through AJAX into the
abpet_faqoption without reloading the page.
➕ Adding a global FAQ
- Click Add New FAQ Item - A collapsed row appears at the end of the list.
- Open the row - Click the pencil icon to reveal the fields.
- Enter the FAQ Title - For example What is the check-in time?
- Write the Description - The answer shown on the frontend.
- Save FAQs Configuration - The library is stored and can now be reused by any event.
📜 Global Terms & Conditions
The Terms & Conditions section under Global Configuration stores the reusable terms that events can import. It holds content only — there are no display toggles on this screen.
✍️ The content field
Term & Conditions Content is a rich-text editor with media support. Write your standard policy once and click Save Term & Conditions Configuration.
🔁 How events use it
- Open an event and go to the Term & Conditions tab.
- Turn Active Term & Conditions? on.
- Leave Use Global Term & Conditions? on to display the global content, or turn it off and use Import Global Term & Conditions to copy and edit it.

🖼️ Slider
The Slider section controls how event galleries are presented on the frontend. It does not store images itself — the images come from each event's General → Gallery field.
⚙️ Settings
| Setting | Description |
|---|---|
| Slider Theme | Carousel Slider or Gallery / Masonry presentation. |
| Images Per Row | Number of thumbnails per row (1–10) for the gallery layout. |
| Image Indicator? | Show or hide the pagination dots in the carousel. |
| Indicator Position | Place the dots at the top, right, bottom or left of the carousel. |
| Visible Popup? | Open clicked thumbnails in a full-screen lightbox. |
| Popup Image Indicator | Show or hide navigation arrows/dots inside the lightbox. |
[abpet-gallery] shortcode to render an event gallery anywhere, or leave it to the event details
template.
☎️ Contact Information
The Contact Information section stores your company's details. These values are available to display on the frontend, for example in headers, footers, or event pages.
📋 Typical fields
| Field | Description |
|---|---|
| Company Name | The name of your organization. |
| Address | Your physical or mailing address. |
| Phone | A contact telephone number. |
| A contact email address. |
🎨 CSS Property
The CSS Property section customizes the plugin's frontend styling without editing code. The values are stored as plugin options and applied through CSS variables.
🎛️ Available variables
| Group | Variables |
|---|---|
| Colours | Base Color, Alternate Color, Default Color, Warning Color, Section Background Color. |
| Typography | Default Font Size, Label Font Size, Font Size H1–H6, Button Font Size. |
| Shape | Default Border Radius. |
| Buttons | Button Text Color and Button Background Color. |
🔗 Shortcodes
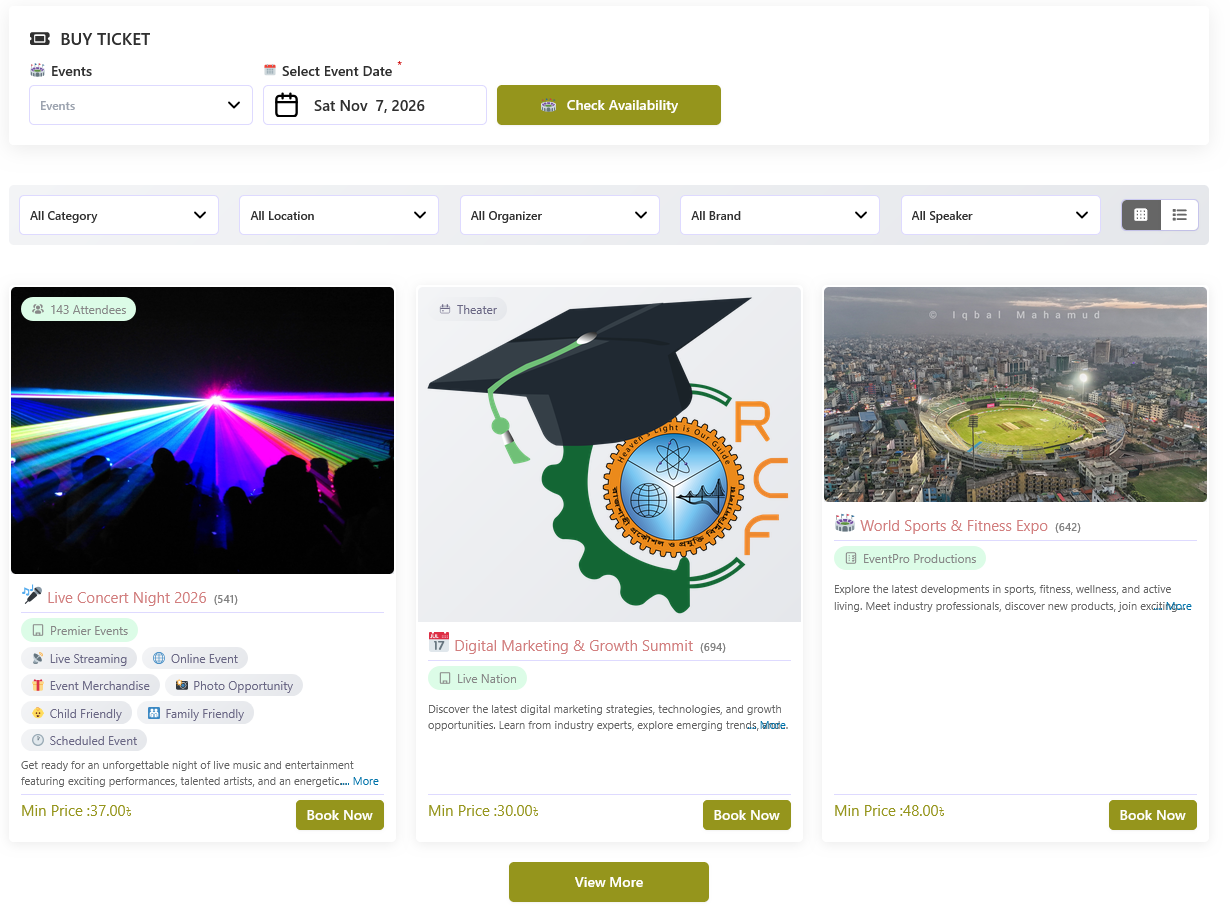
ABP Event Ticket provides shortcodes that let you display event listings, booking interfaces, and image galleries anywhere on your website — pages, posts, widgets, or other supported WordPress areas.
🔄 Overview
Each shortcode supports a set of parameters for controlling layout, filtering, item count, and frontend display. Parameters can be combined to build customised event listing and booking pages.
🎟️ Booking Shortcode
The [abpet-booking] shortcode displays the booking interface. Use it to create a dedicated booking
page where customers can browse available events and complete a purchase. Show all events, or filter by a
specific event, category, location, organizer, brand, or speaker.
| Parameter | Description | Default |
|---|---|---|
post_id |
Display a specific event. When used, other filtering parameters are ignored. Example: [abpet-booking post_id="123"] |
— |
cat_id |
Filter events by category ID. Example: [abpet-booking cat_id="5"] |
— |
loc_id |
Filter events by location ID. Example: [abpet-booking loc_id="2"] |
— |
organizer_id |
Filter events by organizer ID. Example: [abpet-booking organizer_id="3"] |
— |
brand_id |
Filter events by brand ID. Example: [abpet-booking brand_id="4"] |
— |
speaker_id |
Filter events by speaker ID. Example: [abpet-booking speaker_id="7"] |
— |
filter |
Choose which taxonomy dropdowns the event list filter bar shows. Use all (default), none to hide the bar, a list such as category,location, or an exclusion list such as -speaker. Example: [abpet-post filter="category,brand"]. A taxonomy switched OFF in Event Ticket → Configuration → Feature ON/OFF never appears. |
all |
style |
Layout style. Options: grid, list, missionary, minimal. |
grid |
column |
Number of columns for grid layouts (1–10). Example: [abpet-booking column="3"] |
3 |
show |
Number of events to display (0–100). | 0 |
sort |
Sort direction. Options: ASC, DESC. |
ASC |
pagination |
Enable or disable pagination. Options: yes, no. |
yes |
pagination-style |
Pagination style. Options: live, number. |
live |
form |
Search form style. Options: inline. |
inline |

📄 Post List Shortcode
The [abpet-post] shortcode displays events without the booking/search interface. It accepts the
same post_id, category, location, organizer, brand, speaker, filter, style, column, show, sort, and
pagination parameters as the booking shortcode. When post_id is set, the single event's details
template is rendered instead of a list.


🖼️ Gallery Shortcode
The [abpet-gallery] shortcode displays the images saved in the event Slider/Gallery field.
With post_id it shows that event's gallery; without it, the images of all events matched by the
filter parameters are combined. slider_style switches between a gallery grid and a
slider carousel, and column / show control the layout and item count.
| Parameter | Description | Default |
|---|---|---|
post_id |
Show the gallery of one event. Example: [abpet-gallery post_id="123"] |
- |
slider_style |
Gallery layout. Options: gallery, slider. |
gallery |
column |
Images per row (1-10). Also sets the number of visible slider items. | 3 |
show |
Maximum slider items to show. 0 means the column value times three. |
0 |
🎟️ PRO Ticket Lookup Shortcode PRO
The [abpet-ticket] shortcode creates a ticket lookup page where a customer or authorized staff
member can view a booking, download its ticket PDF, and use the check-in action when permitted.
- Create a WordPress page and add
[abpet-ticket]to its content, then publish it. - Sign in to the site before using the page. Signed-out visitors are asked to log in.
- Enter the ticket PIN in Order ID / Ticket ID, then choose View Ticket. The PIN format is
ORDER_ID-BOOKING_ID, for example123-5. - Review the booking details. PDF download requires ABP PDF Tools. Check-in is available to logged-in users who are authorized for that booking.
🧩 Templating
ABP Event Ticket renders its frontend through template files. You can override any template safely, without editing the plugin, by placing a copy in the dedicated override folder.
📁 How overrides work
Copy the template you want to change from the plugin's tb_templates/ folder into
wp-content/tb_templates/, keeping the same relative path. The plugin checks that folder first and
loads your copy when it exists, so your changes survive plugin updates.
Example: to override the default event details page, copy
wp-content/plugins/abp-event-ticket/tb_templates/details_theme/default.php to
wp-content/tb_templates/details_theme/default.php.
wp-content/tb_templates/, not your theme directory. Creating the folder
inside a theme has no effect.
📂 Available templates
| Folder | Templates |
|---|---|
| details_theme/ | default.php, light.php, modern.php — the three event details
page layouts. |
| list/ | default.php, missionary.php, minimal.php — event listing
layouts. |
| layout/ | Booking pieces: ticket_type.php, sp_type.php,
client_form.php, additional_services.php, total_price.php,
gallery.php, slider.php, slider_popup.php,
registration.php, faq.php, term_condition.php,
related_item.php, post_filter.php, search_form.php,
pagination.php and display_cart_item.php. |
| map/ | default.php, light.php, modern.php — location map styles. |
| speaker/ | default.php, light.php, modern.php — speaker layouts. |
| timeline/ | default.php, light.php, modern.php — timeline layouts. |
| page/ | details_page.php, brand.php, category.php,
location.php, organizer.php, speaker.php — archive and
details page wrappers. |
🌐 Translation
ABP Event Ticket is translation-ready. Every user-facing string is wrapped for localization, and the
plugin ships with a .pot template file.
🛠️ Translating the plugin
- Use a translation plugin — tools such as Loco Translate let you translate strings directly from the WordPress admin.
- Or use Poedit — open
wp-content/plugins/abp-event-ticket/languages/abp-event-ticket.potin Poedit, translate the strings, and save a.poand.mopair. - Upload the files — place the translated
.poand.mofiles inwp-content/plugins/abp-event-ticket/languages/(or inwp-content/languages/plugins/). - Set the site language — choose your language under Settings → General → Site Language.
abp-event-ticket and the domain path /languages. Keep
the domain when creating translations.
Try a different search term.